Experience seamless control over your photos with Evoto Mobile’s Wired Tethered Shooting. Connect your camera directly to your device to instantly preview, edit, and manage images in real time—saving time, improving workflow efficiency, and ensuring every shot is captured exactly as intended.
Compatible Camera Models

Preparation Before Wired Tethered Shooting
- A memory card must be installed in the camera.
- iOS version must be 15 or above.
Choosing the Connection Cable
iPhone data ports include Lightning (for iPhone 14 and earlier models) and USB-C (for iPhone 15 and later models). Since Lightning cables do not natively support OTG, a Lightning-to-USB-A adapter with OTG functionality is required.
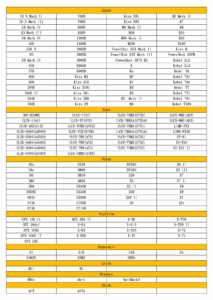
Camera data ports vary widely; the following list is provided for reference.
Enabling App Permissions
After opening Evoto and creating a new project, a prompt saying “Evoto Would Like to Access the Camera” will appear. Simply tap “Allow”.
If “Don’t Allow” was selected by mistake, go to Settings → Apps, find Evoto, and enable the camera permission.
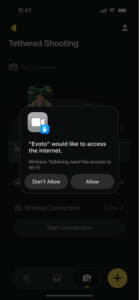
You also need to make sure that the “Network” permission is enabled before starting a tethered shoot.

Confirming Camera Detection on iPhone
Open the built-in Photos app on your iPhone. If the connected camera device appears as shown in the image, it means the iPhone has successfully connected to the camera.
Camera Settings
Specific settings for different camera brands:
- Canon Cameras
- Sony Cameras
- Nikon Cameras
- Fujifilm Cameras
- Panasonic Cameras
- Leica Cameras
- Olympus Cameras
Start Tethered Shooting
If this is your first time using Evoto or you haven’t created any projects yet, select Tethered Shooting on the home page or tap the Tethered button at the bottom.
Once you enter the interface, if the camera model and the Connected status are displayed, it means the tethered connection has been successfully established.
If the message “Not Connected” appears, it may be caused by an incompatible tethering cable, insufficient permissions on your phone or camera, an unsupported camera model, or the camera being connected to another device. You can follow the steps outlined in the “Preparation Before Tethered Shooting” section to troubleshoot. If the issue persists after checking, please contact support@evoto.ai for assistance — our team will help you resolve it.
If you have already created a project, you can tap the Tethered button at the bottom to enter the tethered shooting page. Alternatively, you can also access it in another way: on the Home page under the Projects view, tap the Create New Project button in the bottom right corner, enter a project name in the pop-up window, confirm, and then select Tethered Shooting.
After a successful tethered connection, Evoto provides two options: Auto Import During Shooting and Import Existing Photos from Camera:
- Auto Import During Shooting: Tap the Tethered Shooting button, then select a project on the new page (you can create a new project or choose an existing one). All subsequent photos taken with the camera will be automatically imported into Evoto.
- Import Existing Photos from Camera: Select the photos you want to import from the camera’s photo list. Then choose either Edit Existing Project or Edit New Project as needed.
Tethered Shooting Settings
Tethered Shooting Interface Overview
-
Back: Return to the previous menu.
-
Undo/Redo: Undo or redo a step. You can also tap History to jump to any previous operation. Additionally, you can reset photo adjustments via the dropdown menu with options: Reset All Effects, Reset Portrait Effects, and Reset Color Effects.
-
More Functions: Includes: View All Project Photos, History, Reset Effects, Sync to Others, Import Photos, Tethered Shooting, Report Issue, and Delete Current Photo.
-
View All Project Photos: See all photos in the current project. Supports Import More Photos, Delete Photos, Batch Sync, Export, Filter, and Sort.
-
History: View all operations performed on the current photo and jump to any step.
-
Sync to Others: Apply the current photo’s edits to other photos.
-
Import Photos: Import additional photos from your album into the project.
-
Tethered Shooting: Enter the tethered shooting interface.
-
Report Issue: Upload error logs or abnormal information.
-
Delete Current Photo: Permanently delete the current photo (cannot be undone).
-
-
Export: Export selected photos.
-
Sync to Others: Apply the current photo’s edits to other photos.
-
Exit: Exit the Tethered Shooting page.
-
Next Photo Effect: Offers three options for new photos: Sync Previous Photo Effect, Apply Preset, or No Effect. If Apply Preset is selected, you can choose from official recommended presets or your own presets; subsequent photos will automatically apply this preset.
-
Preview Settings: Two options: Latest Captured Photo or Keep Current Selection.
-
Latest Captured Photo: Preview automatically shows the newest photo taken.
-
Keep Current Selection: Preview stays on the currently selected photo and does not change with new captures.
-
-
Imported Photo Format: Depends on the camera’s saved format settings:
-
If the camera saves both RAW and JPEG, the default import format is JPEG Only, with options to select RAW & JPEG or RAW Only.
-
If the camera saves only RAW or only JPEG, the default import format matches the camera setting, and the other options are disabled.
-


