The Auto Import & Export feature in Evoto streamlines your workflow by monitoring designated folders for new images, automatically applying a selected preset, and exporting the edited results. This powerful functionality is ideal for high-volume image processing and works seamlessly with tethered shooting.
Overview
Auto Import & Export allows you to:
- Monitor one or more folders for new images.
- Automatically apply a preset on import.
- Export edited images to a separate destination folder.
- Customize file structure, export frequency, and more.
This feature helps automate repetitive tasks, allowing you to focus on creative work while Evoto handles the processing.
How to Set Up Auto Import & Export
Evoto makes it easy to configure this feature in just a few steps.
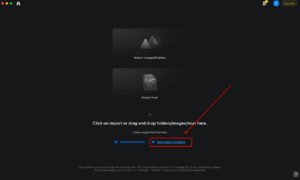
Step 1: Create a New Project
Start by creating a new project. It is recommended to do this from the beginning to ensure that images will be auto-exported according to the corresponding import files within one project. Locate the Auto Import & Export option and click on it to open the configuration.
Step 2: Enable Auto Import
Set Up Watched Folders:
- In the Preview Page, click on watched folder and add the folders you want to monitor. You can add up to 10 folders, and Evoto supports unlimited first-level subfolders within each, allowing for multiple workflows to run simultaneously.
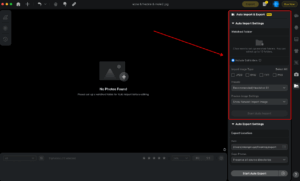
Select File Types and Presets:
- Choose the file types you want to import (e.g., JPEG, RAW, TIFF, PNG).
- Select the preset you wish to be automatically applied to the imported images.
Start Auto Import:
- Once configured, click Start Auto Import to enable the feature. Evoto will automatically import only new images added after this point; existing files in the folder will not be imported.
Step 3: Enable Auto Export
Set the Export Path:
- Define a folder where exported files will be saved. The export path must be different from the import path to avoid file conflicts.
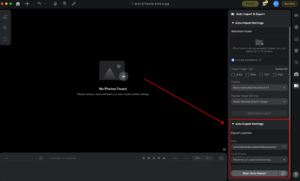
Choose Folder Structure:
- Preserve Original Folder Structure: Maintains the folder hierarchy of the original files, making file management more efficient.
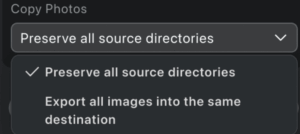
- Export All Images into a Single Destination: Flattens the output into one destination folder for simpler management.
Customize Export Settings:
- Click the More Settings icon to customize export settings, including:
- Auto Export Interval: Allows you to set the time interval (ranging from 10 seconds to 1 hour) between auto-export actions.
- Image Naming, Quality, and Watermark Settings: These are the same options as manual export.

Start Auto Export:
- Once all export settings are configured, click Start Auto Export to activate the feature.


