You can use the Manual Tuning Pen to brush or erase the feature affecting the parts of the picture that have been mistakenly damaged after changing the background.
Evoto supports two different modes of Headshot Backdrop Changer.
Backdrop Changer
Backdrop Changer (Recommended)
For the recommended headshot backdrop changer, you can choose to replace the corresponding background in the software with one click.
Headshot Backdrop Changer (My backdrops)
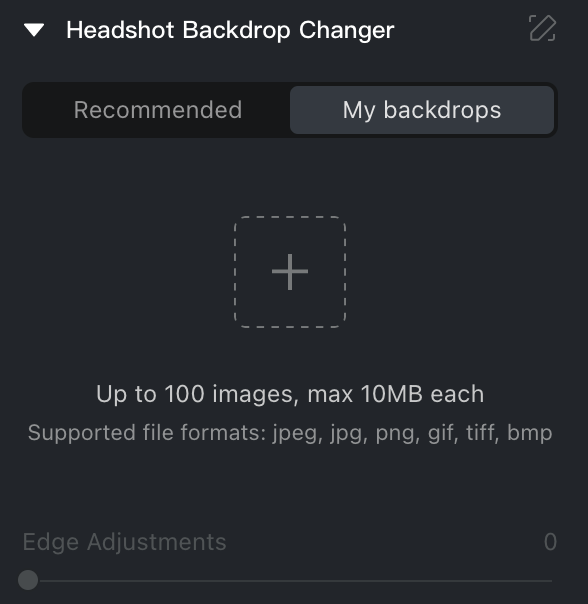
When you upload a customized background, click on the ➕ icon to upload the background material. The customized background supports a maximum size of 10MB and currently supports jpeg, jpg, png, gift, tiff, and bmp format.
Backdrop Detail Adjustment
Background enhancement with detailed adjustments, supporting fill mode selection, size, and position adjustments. Enhancing the practicality of changing backgrounds for headshot photos, allows users to finely control the appearance of images for a more aesthetic and natural look, while also providing a degree of creative freedom.
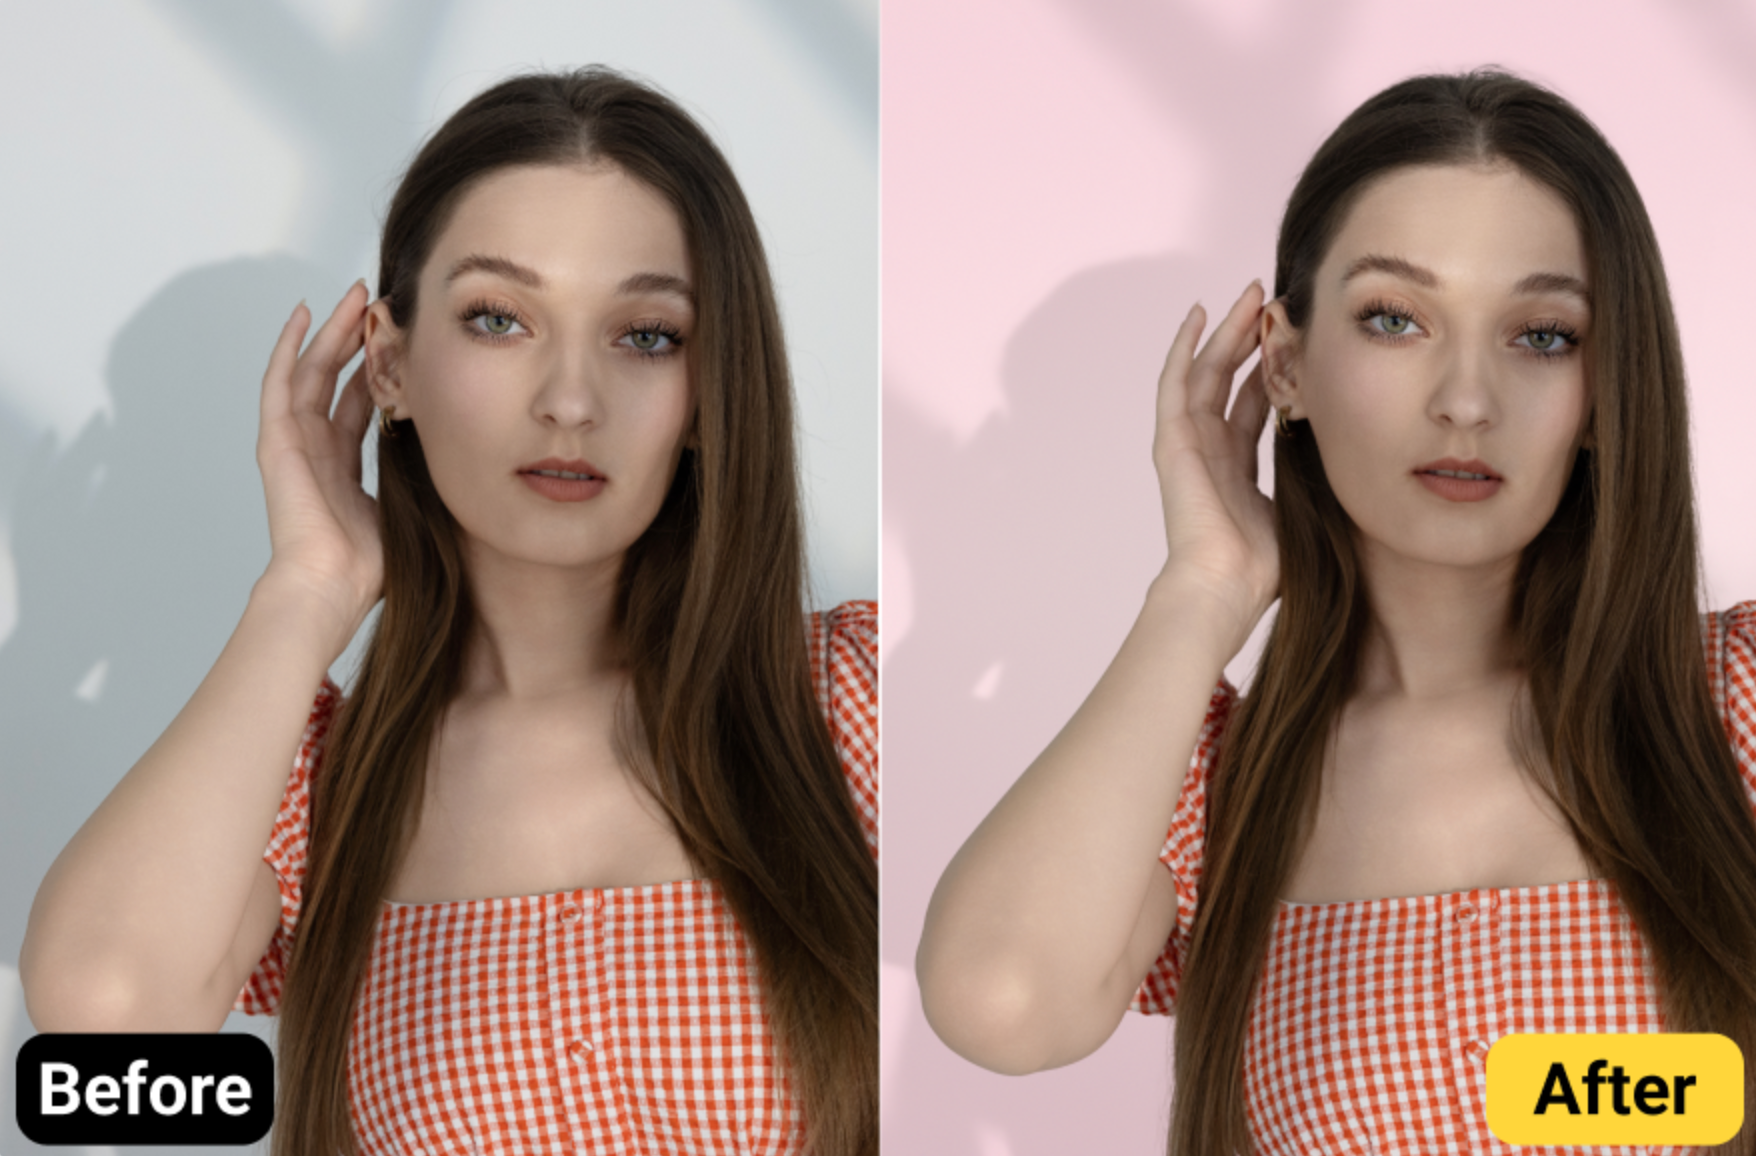
Background Replacement with Selective Preservation
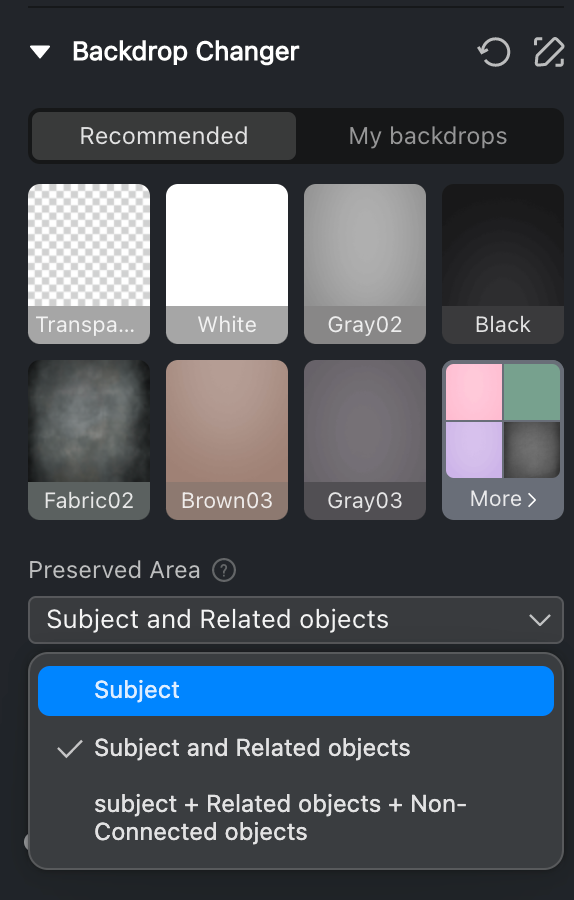
The headshot background replacement feature now supports selecting the retention range:
- Subject: Retain the main subject only.
Objects that affect the integrity of the subject will be retained and counted as part of the Subject.
- Subject and Related Objects: Retain the main subject and related items.
- Subject + Related Objects + Non-Connected Objects: Retain the main subject, related items, and unconnected objects.
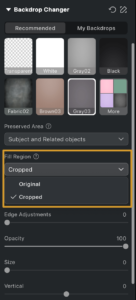
Fill Region
A new Fill Region dropdown has been added to the Background Adjustments – Backdrop Changer section, with two options:
-
Original Image: The new background is filled based on the original, uncropped image.
-
Cropped Image: The new background is filled based on the cropped image.
Fill Mode
The headshot photo backdrop replacement feature supports users in selecting fill modes during background replacement.
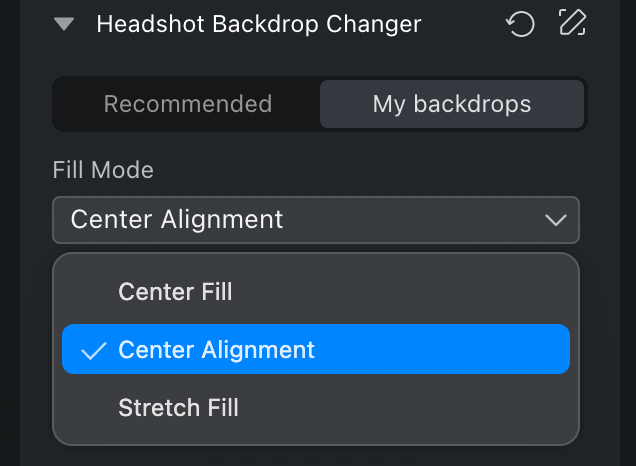
- Stretch to Fill: The background is stretched to fill the designated area, which may result in distortion.
- Center Fill: The background material is scaled proportionally to maintain its original aspect ratio and fill the area without distortion.
- Center Alignment: The material is placed without stretching, preserving its aspect ratio, and aligning the shorter edge with the corresponding edge of the area.
Details Adjustment
After replacing the background, users can adjust the edge, the opacity of background, move it, and resize it.
- Edge Adjustments: Use a slider to control the edge adjustment effect, typically used to optimize the effect of stray hair on the background.
- Opacity: Adjusts the transparency of the background material, with a slider range from 0 to 100 (default is 100).
- Size: Resizes the background, with a slider range from 0 to 100 (default is 0).
- Vertical Position: Anchored at the center point (0,0).
- Horizontal Position: Anchored at the center point (0,0).
Shadows
AI Retain Shadows
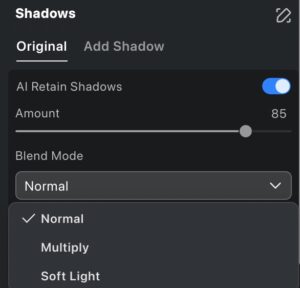
Allow users to retain the original subject’s shadow when changing the background, ensuring the original lighting and shadow effects are preserved.
- Exclusive Interaction
If the user currently has the “Add Shadow” feature enabled and switches to the “Original Image Shadow” tab, the “AI Retain Shadow” switch will turn on and the “Add Shadow” feature will be disabled. The reverse is also true. - Brush Interaction
When the user’s effect is applied in “AI Add Shadow,” clicking the brush will invoke the “Manual Tuning” which works similarly to the “Freckles and Acne” feature.
When the user’s effect is applied in “Add Shadow,” clicking the brush will invoke the current “Add Shadow Position Adjustment.”
Applicable Scenarios: Solid color background scenes, simple non-solid color background scenes.
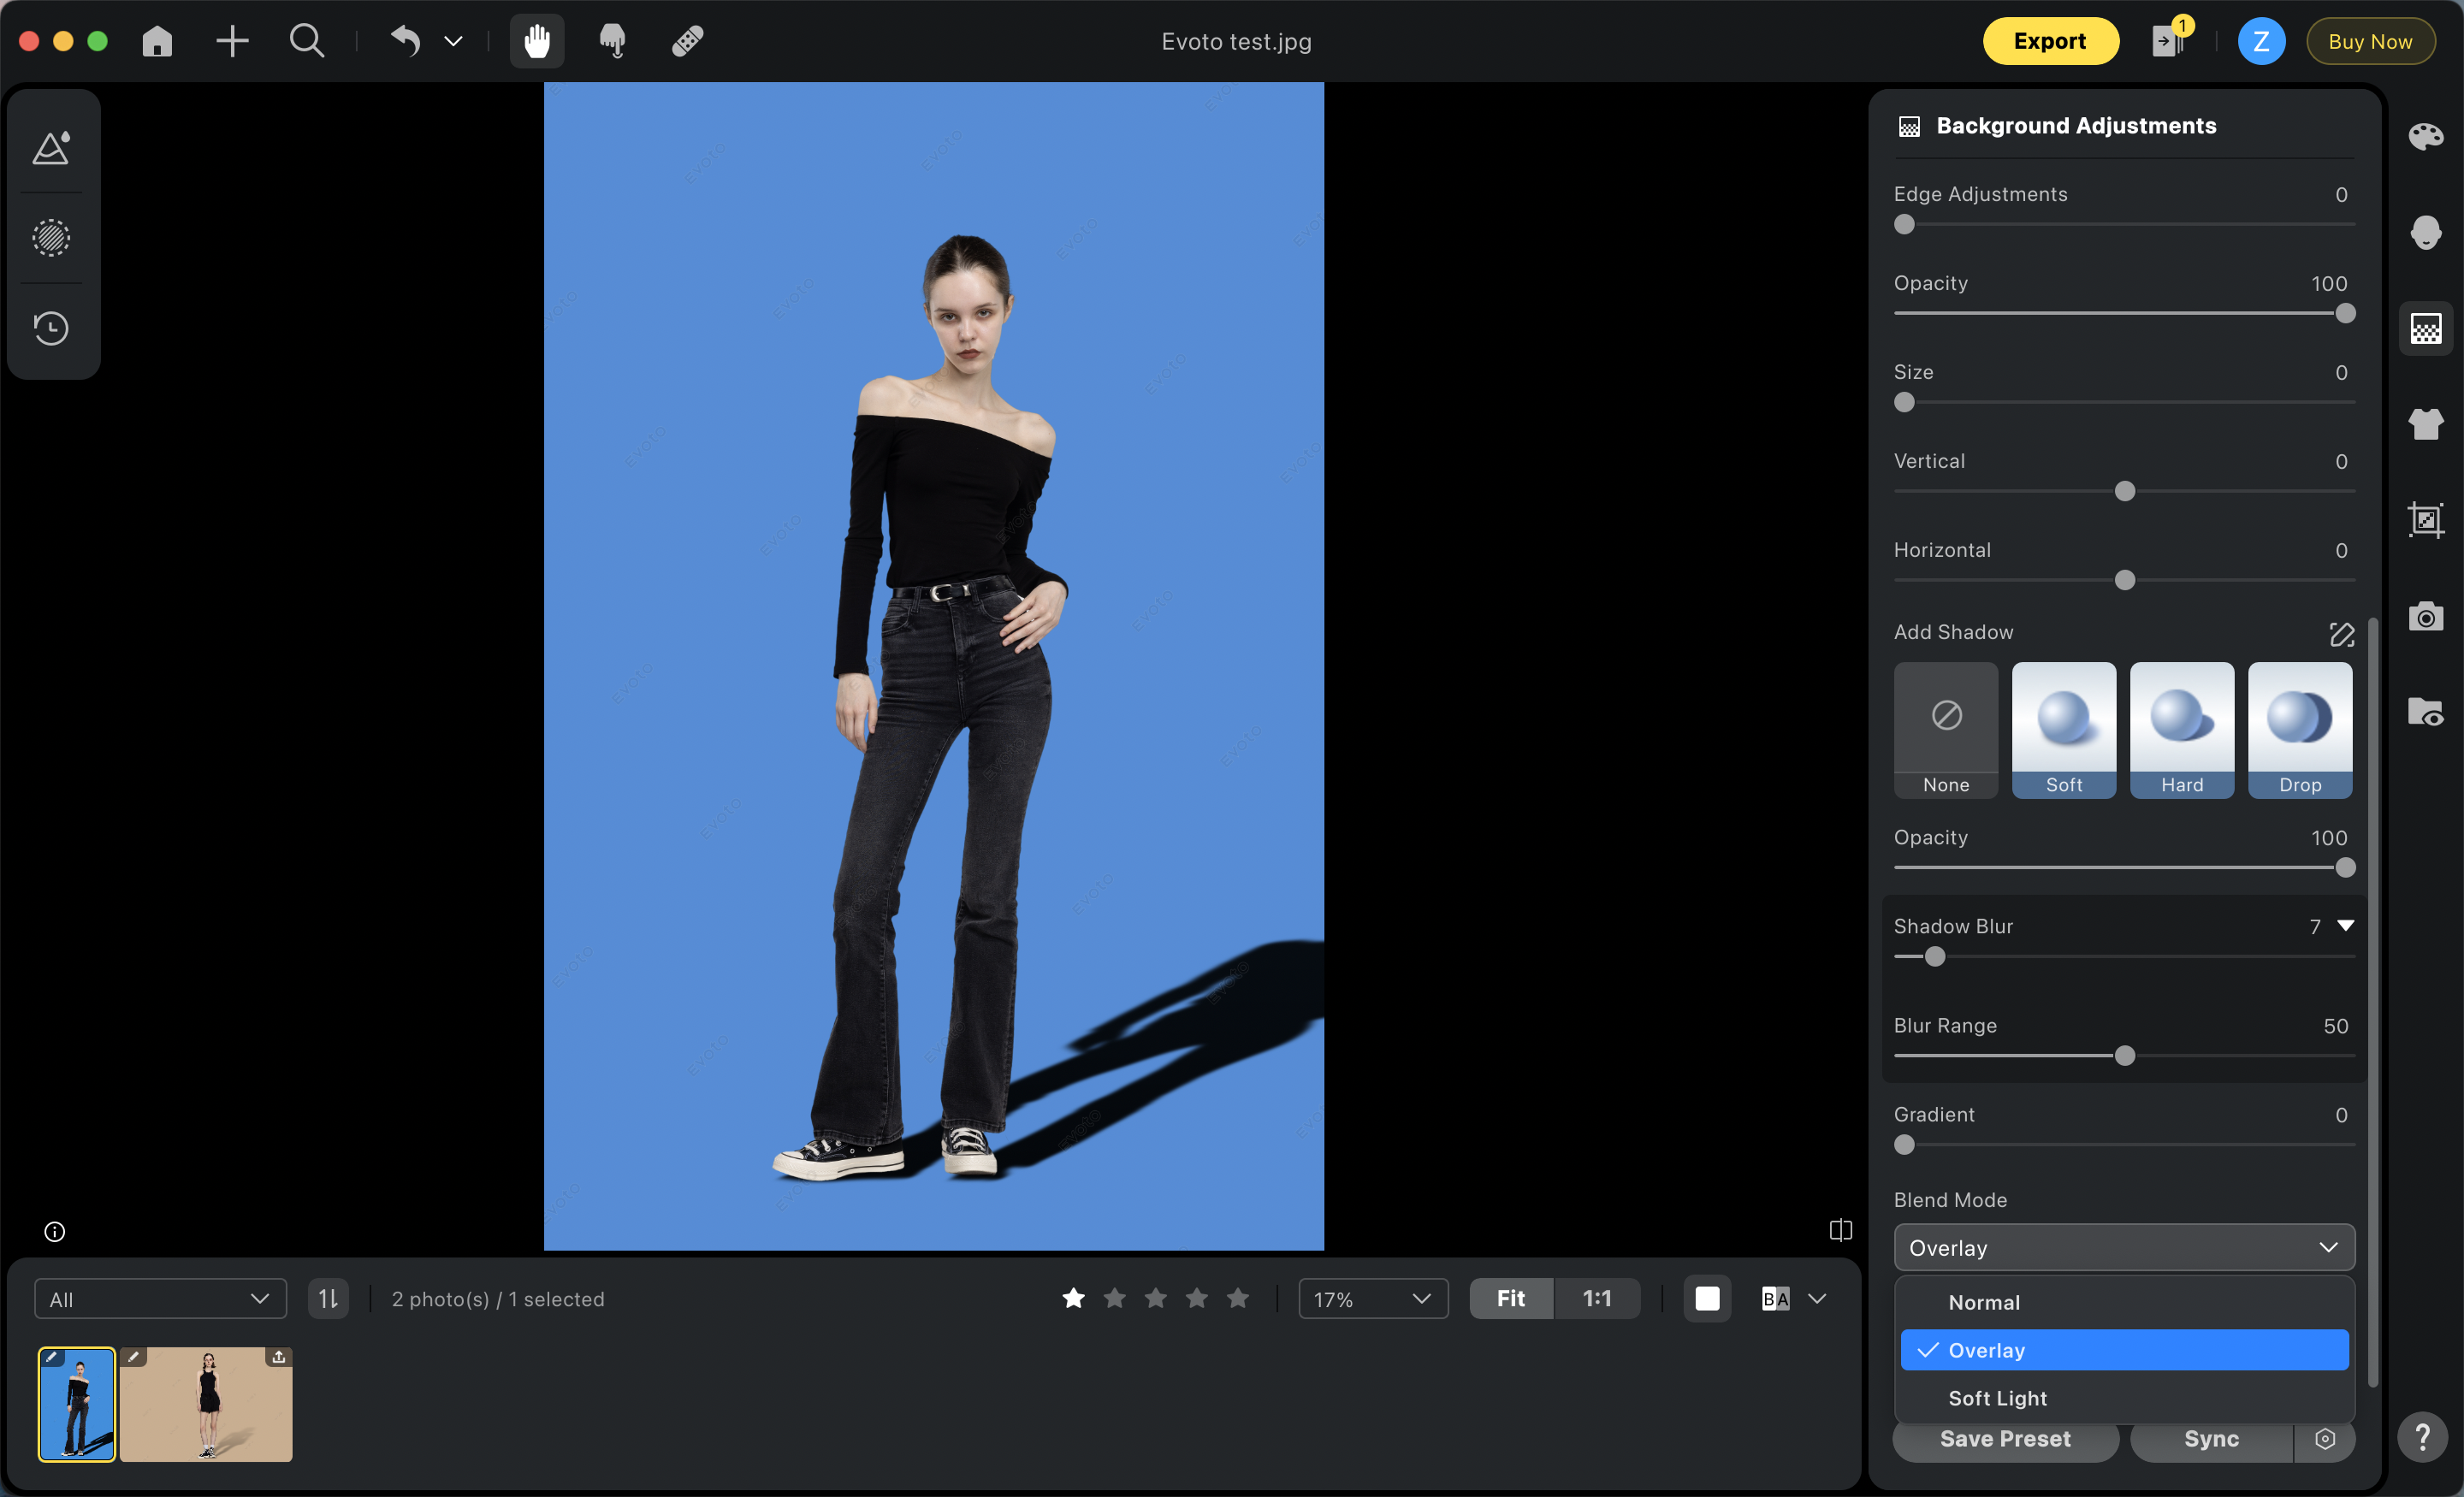
Add Shadow
A new Add Shadow feature has been added to the Backdrop Changer feature group.
The Add Shadow feature is disabled if Backdrop Changer is not activated. Once activated, the default selection for add shadow is set to None.
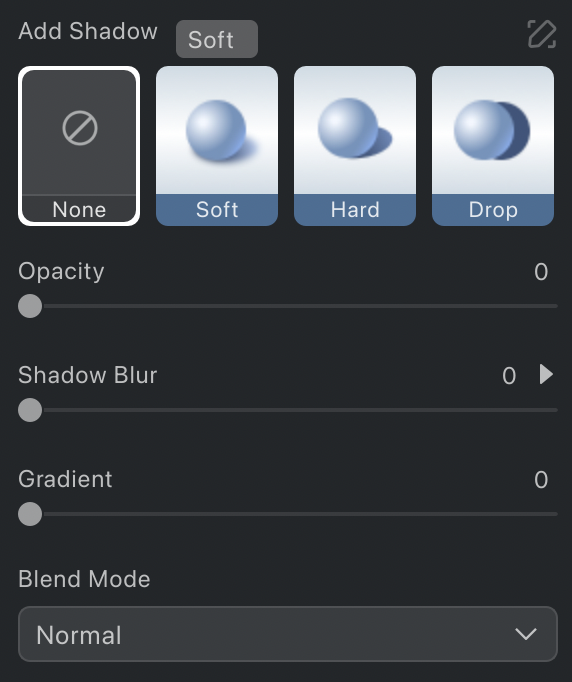
In Add Shadow, 3 preset shadow options are provided for users to easily apply and adjust.
Soft:
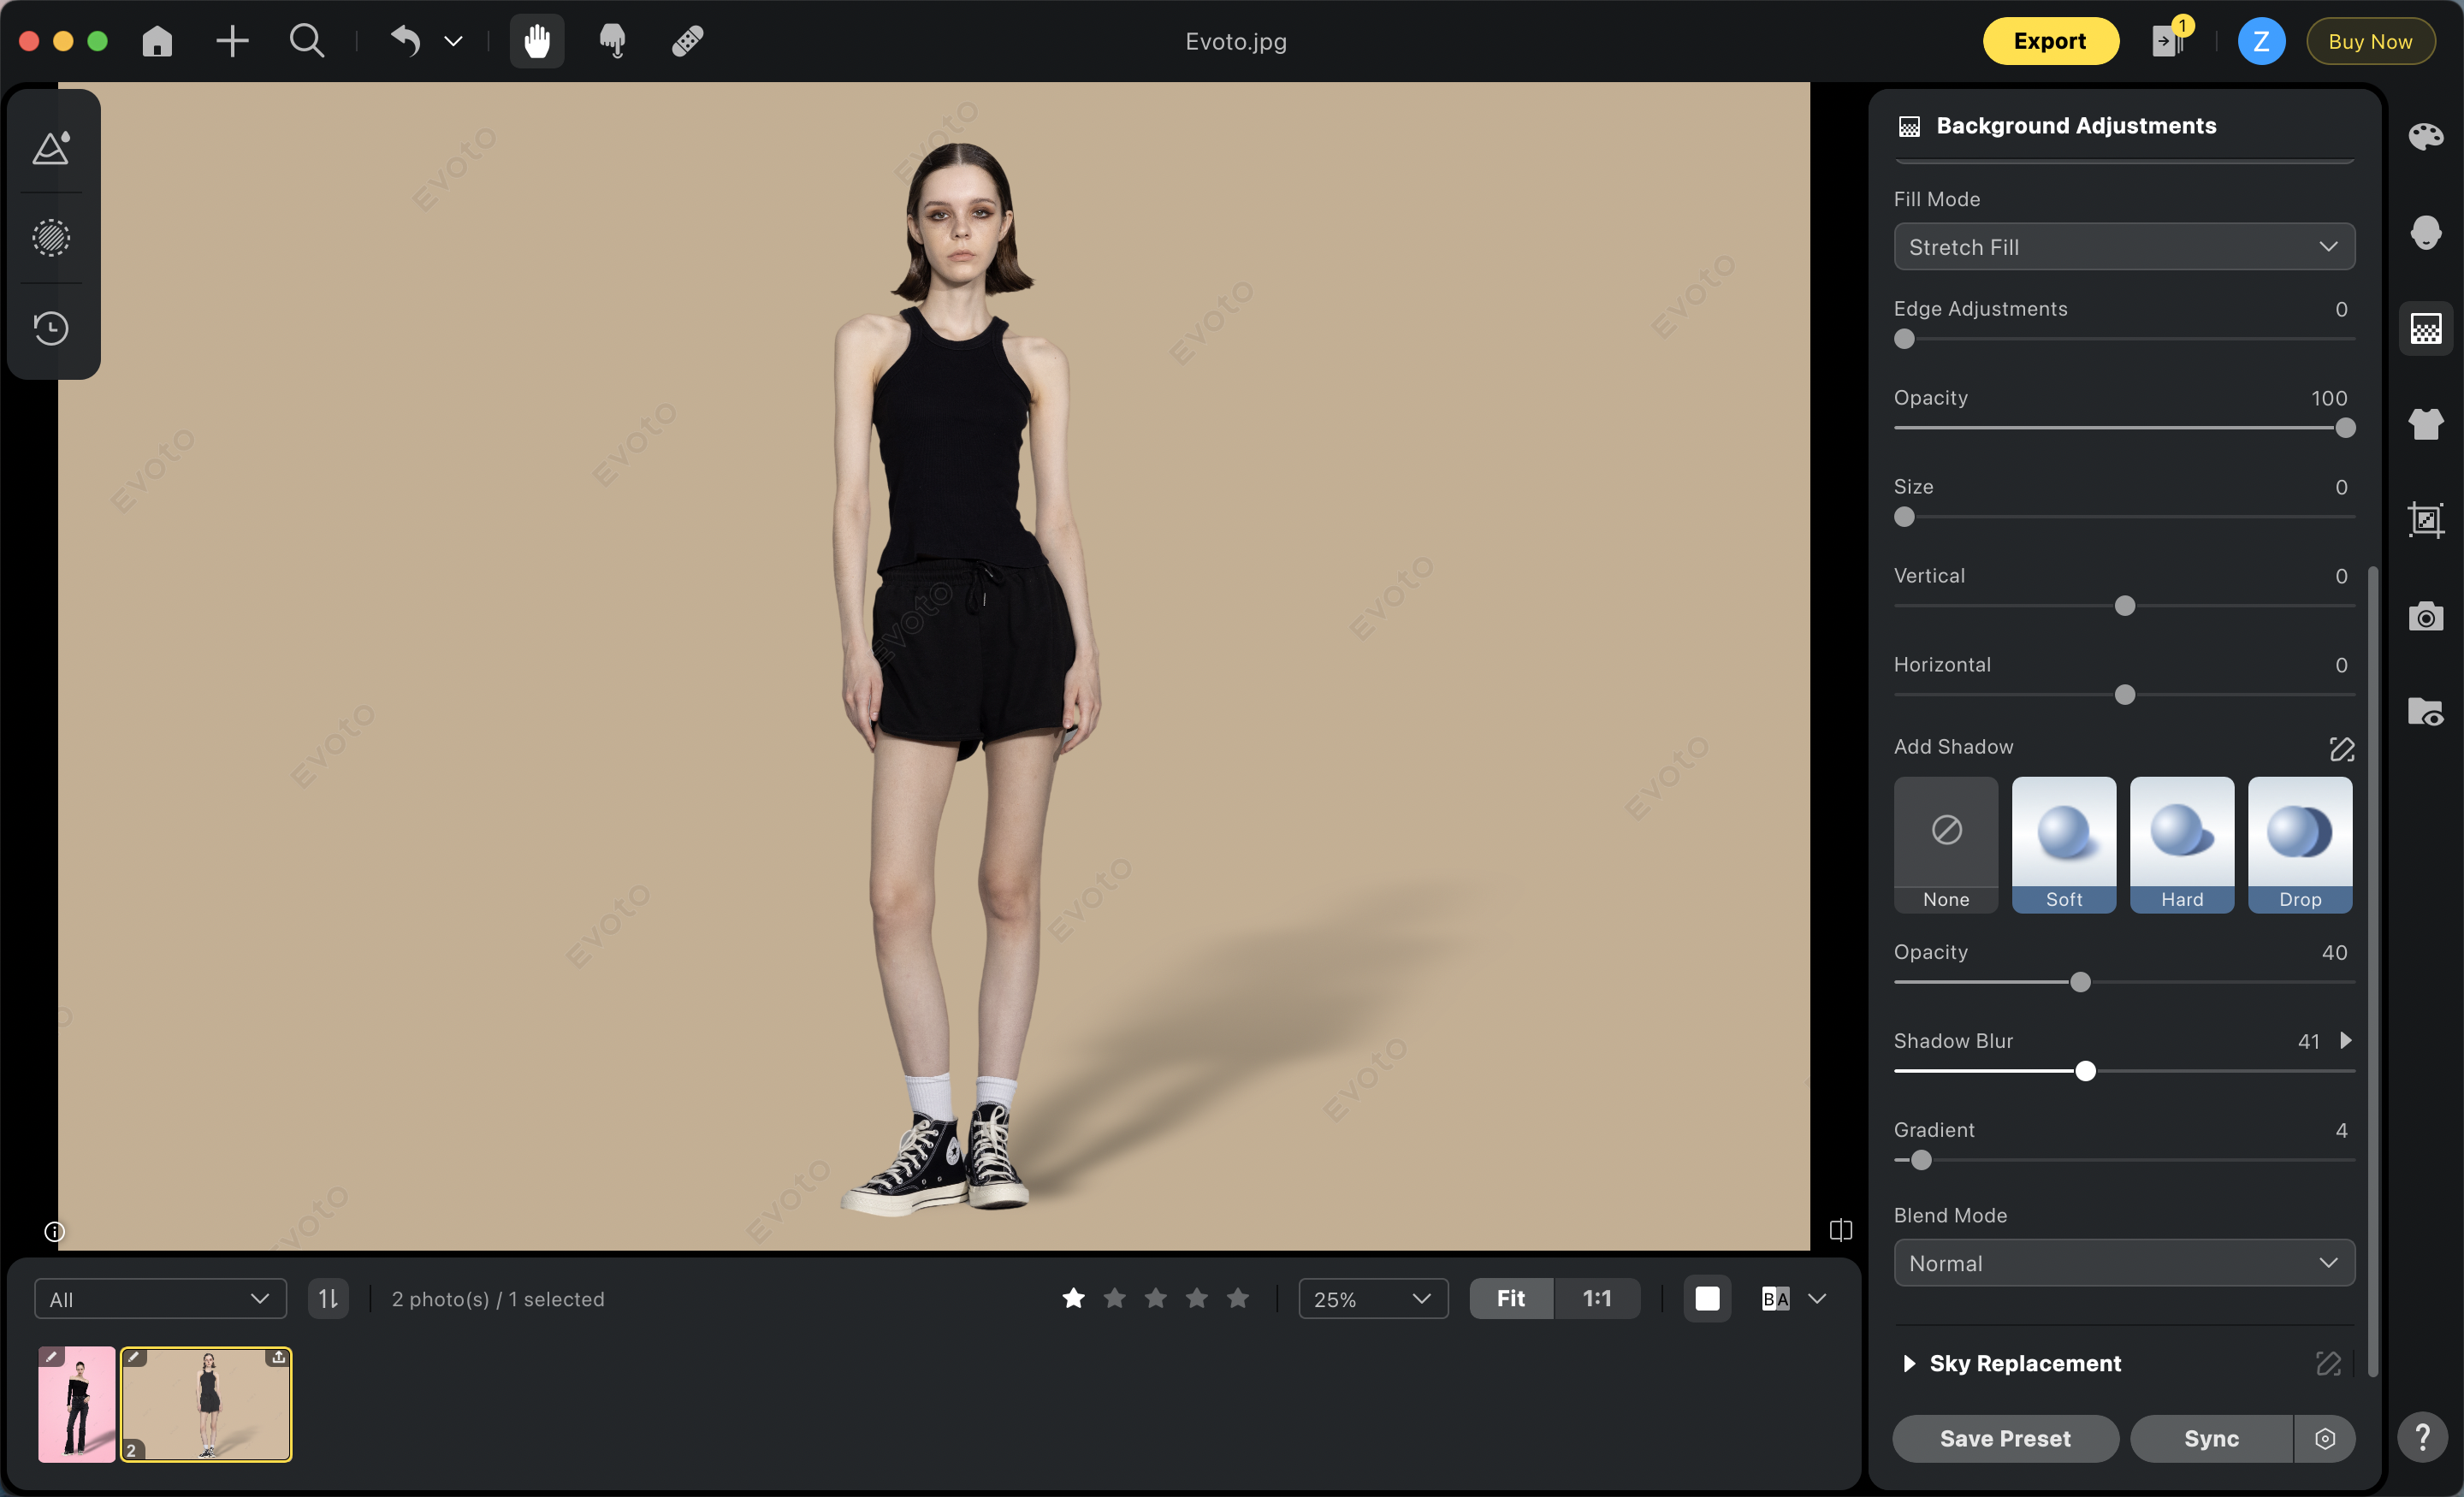
Description: A softer, diffused light scenario.
Recommended: Suitable for most studio shooting scenarios.
Hard:

Description: A strong, direct light scenario.
Recommended: Ideal for outdoor shooting under direct sunlight or some artistic lighting setups.
Drop:
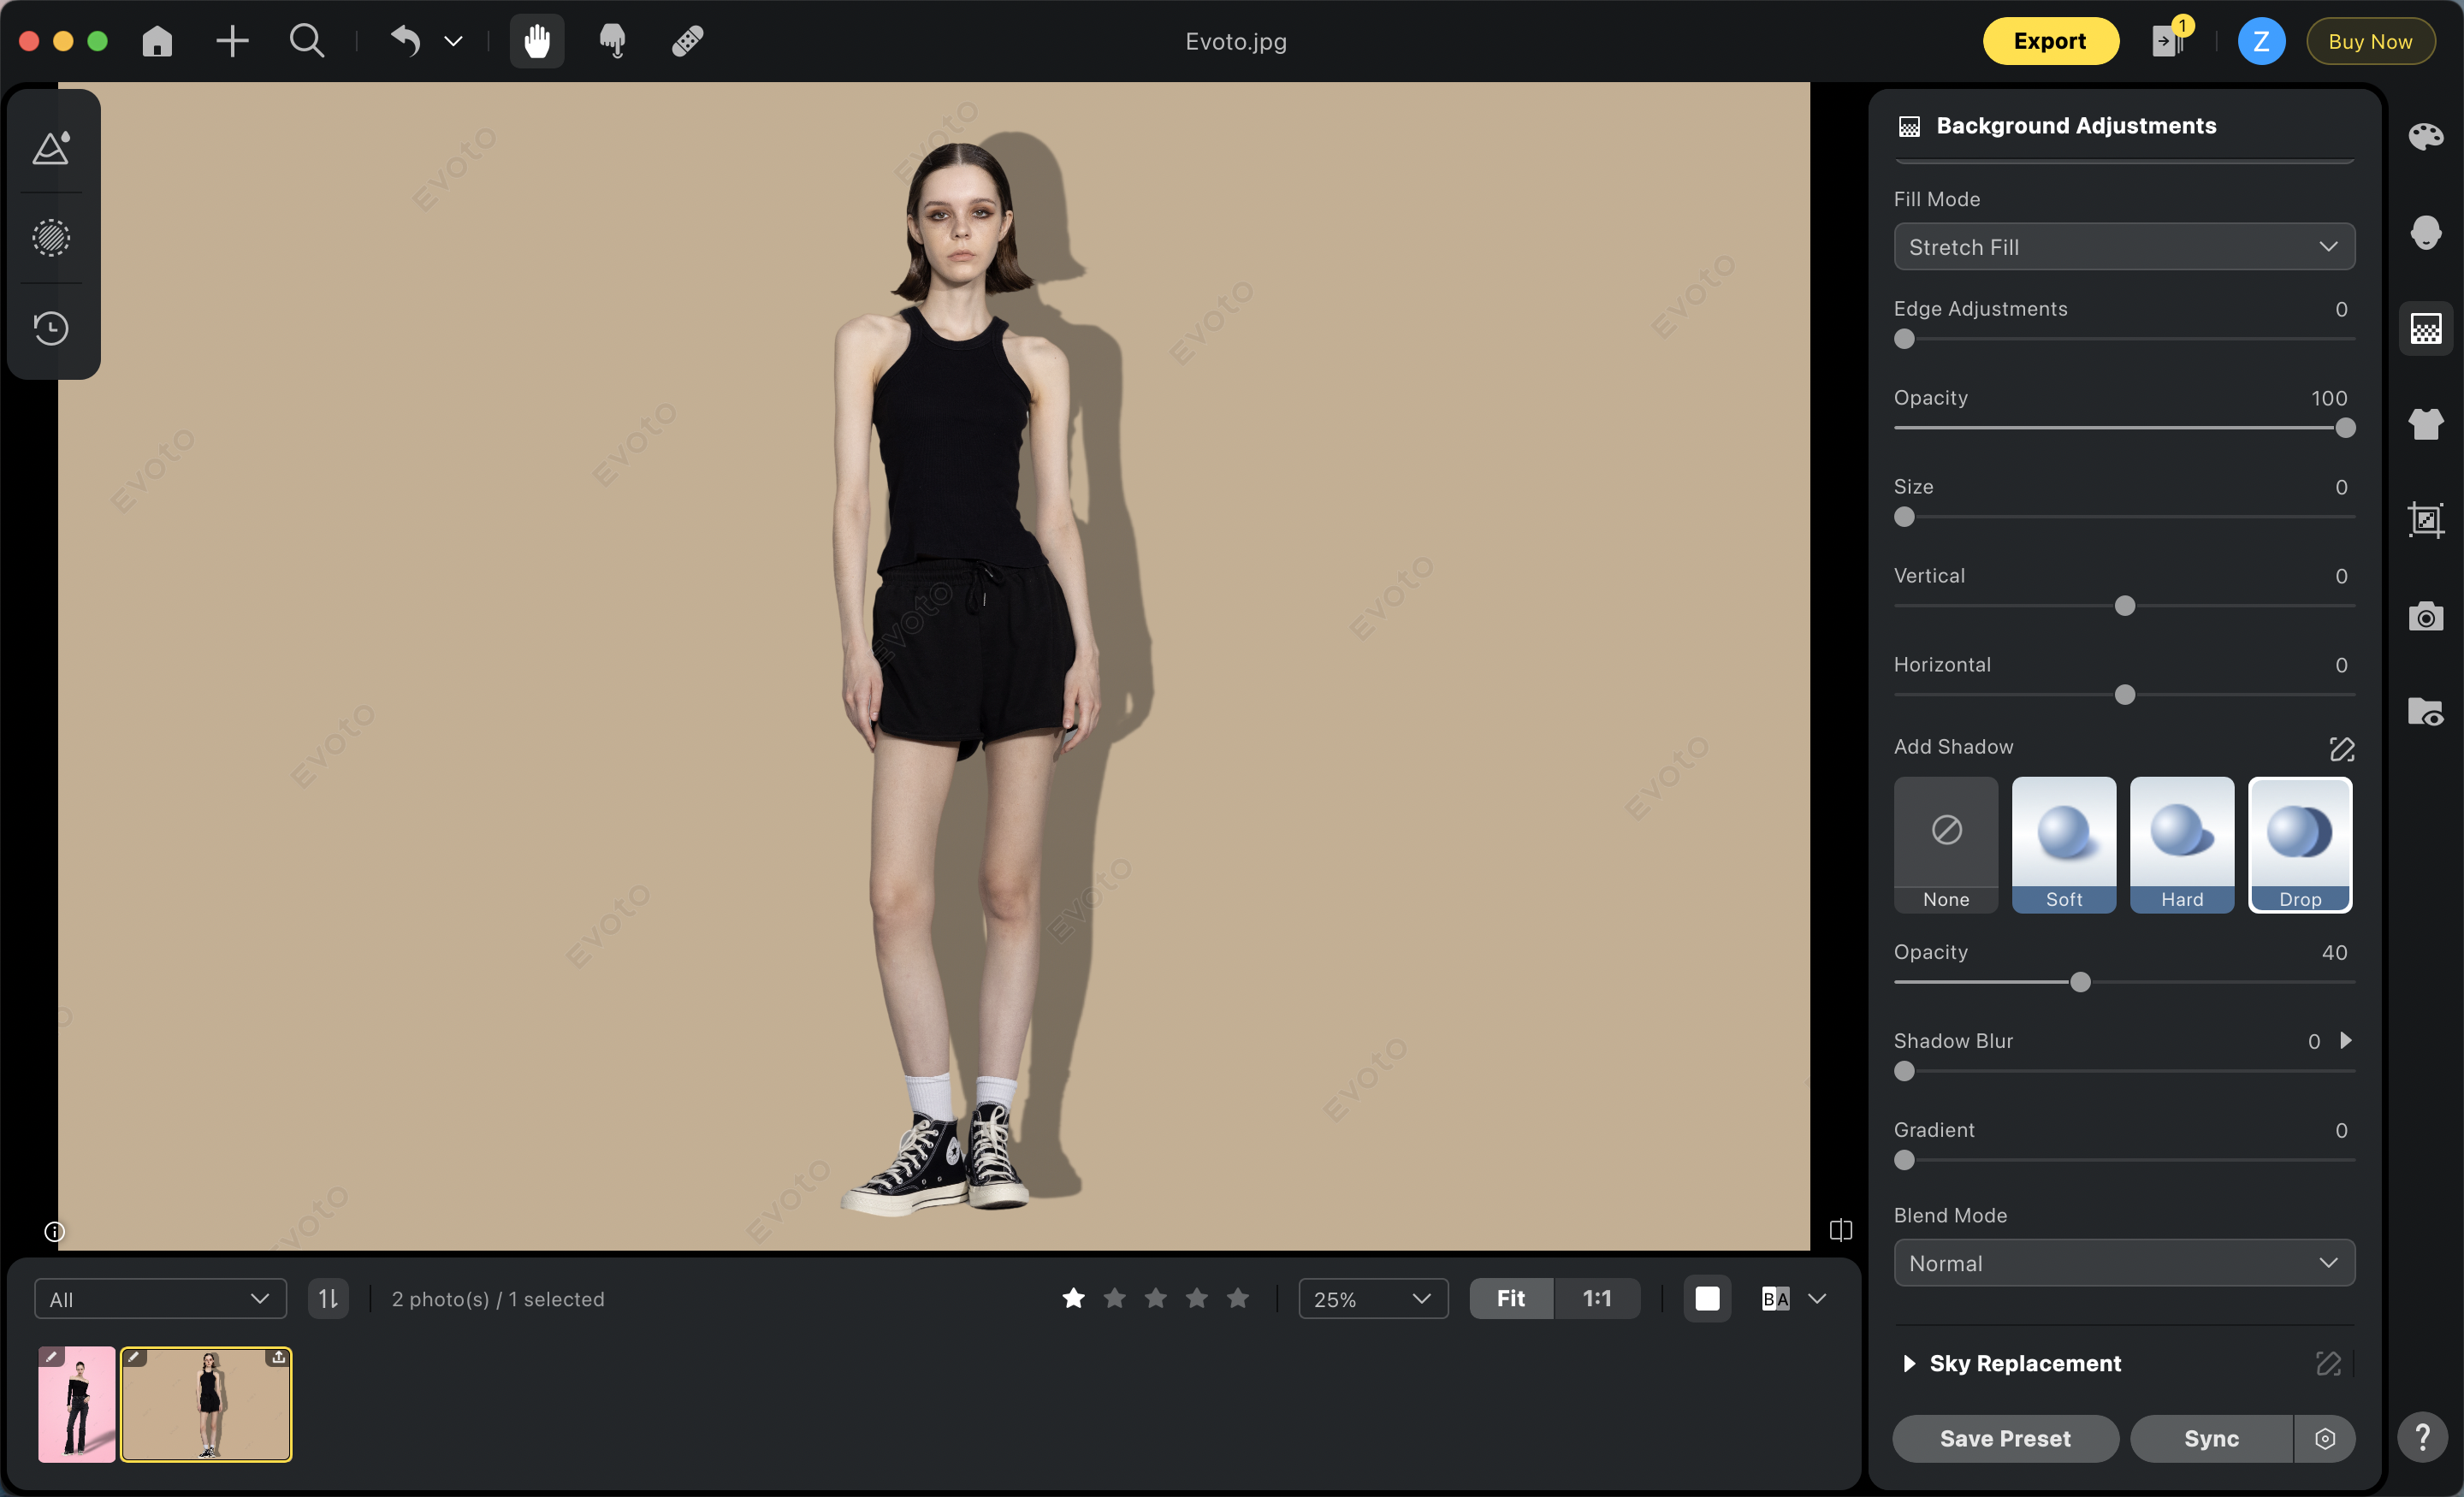
Description: The shadow is parallel to the subject.
Recommended: Primarily used in product photography or certain artistic portrait lighting.
Fine-tune the Shadow
Users can fine-tune the shadow effects or create custom shadows with the following sliders:
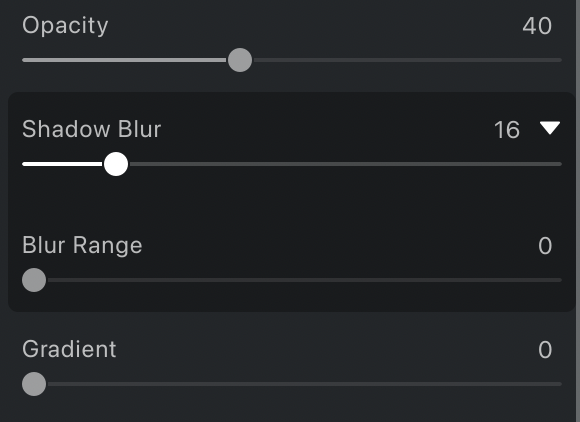
- Opacity: Adjusts the shadow’s opacity. The maximum value corresponds to full black, and the minimum value makes the shadow invisible.
- Shadow Blur: As the value increases, the shadow edges become more blurred.
- Blur Range: sub-slider for controlling the area of the blur. When set to the minimum, the bottom of the shadow mask remains clear, and it gradually becomes more blurred upwards. When set to the maximum, the entire shadow mask (from bottom to top) becomes blurred.
- Gradient: Adds a gradual fade effect to the shadow. At the maximum value, the shadow disappears completely.
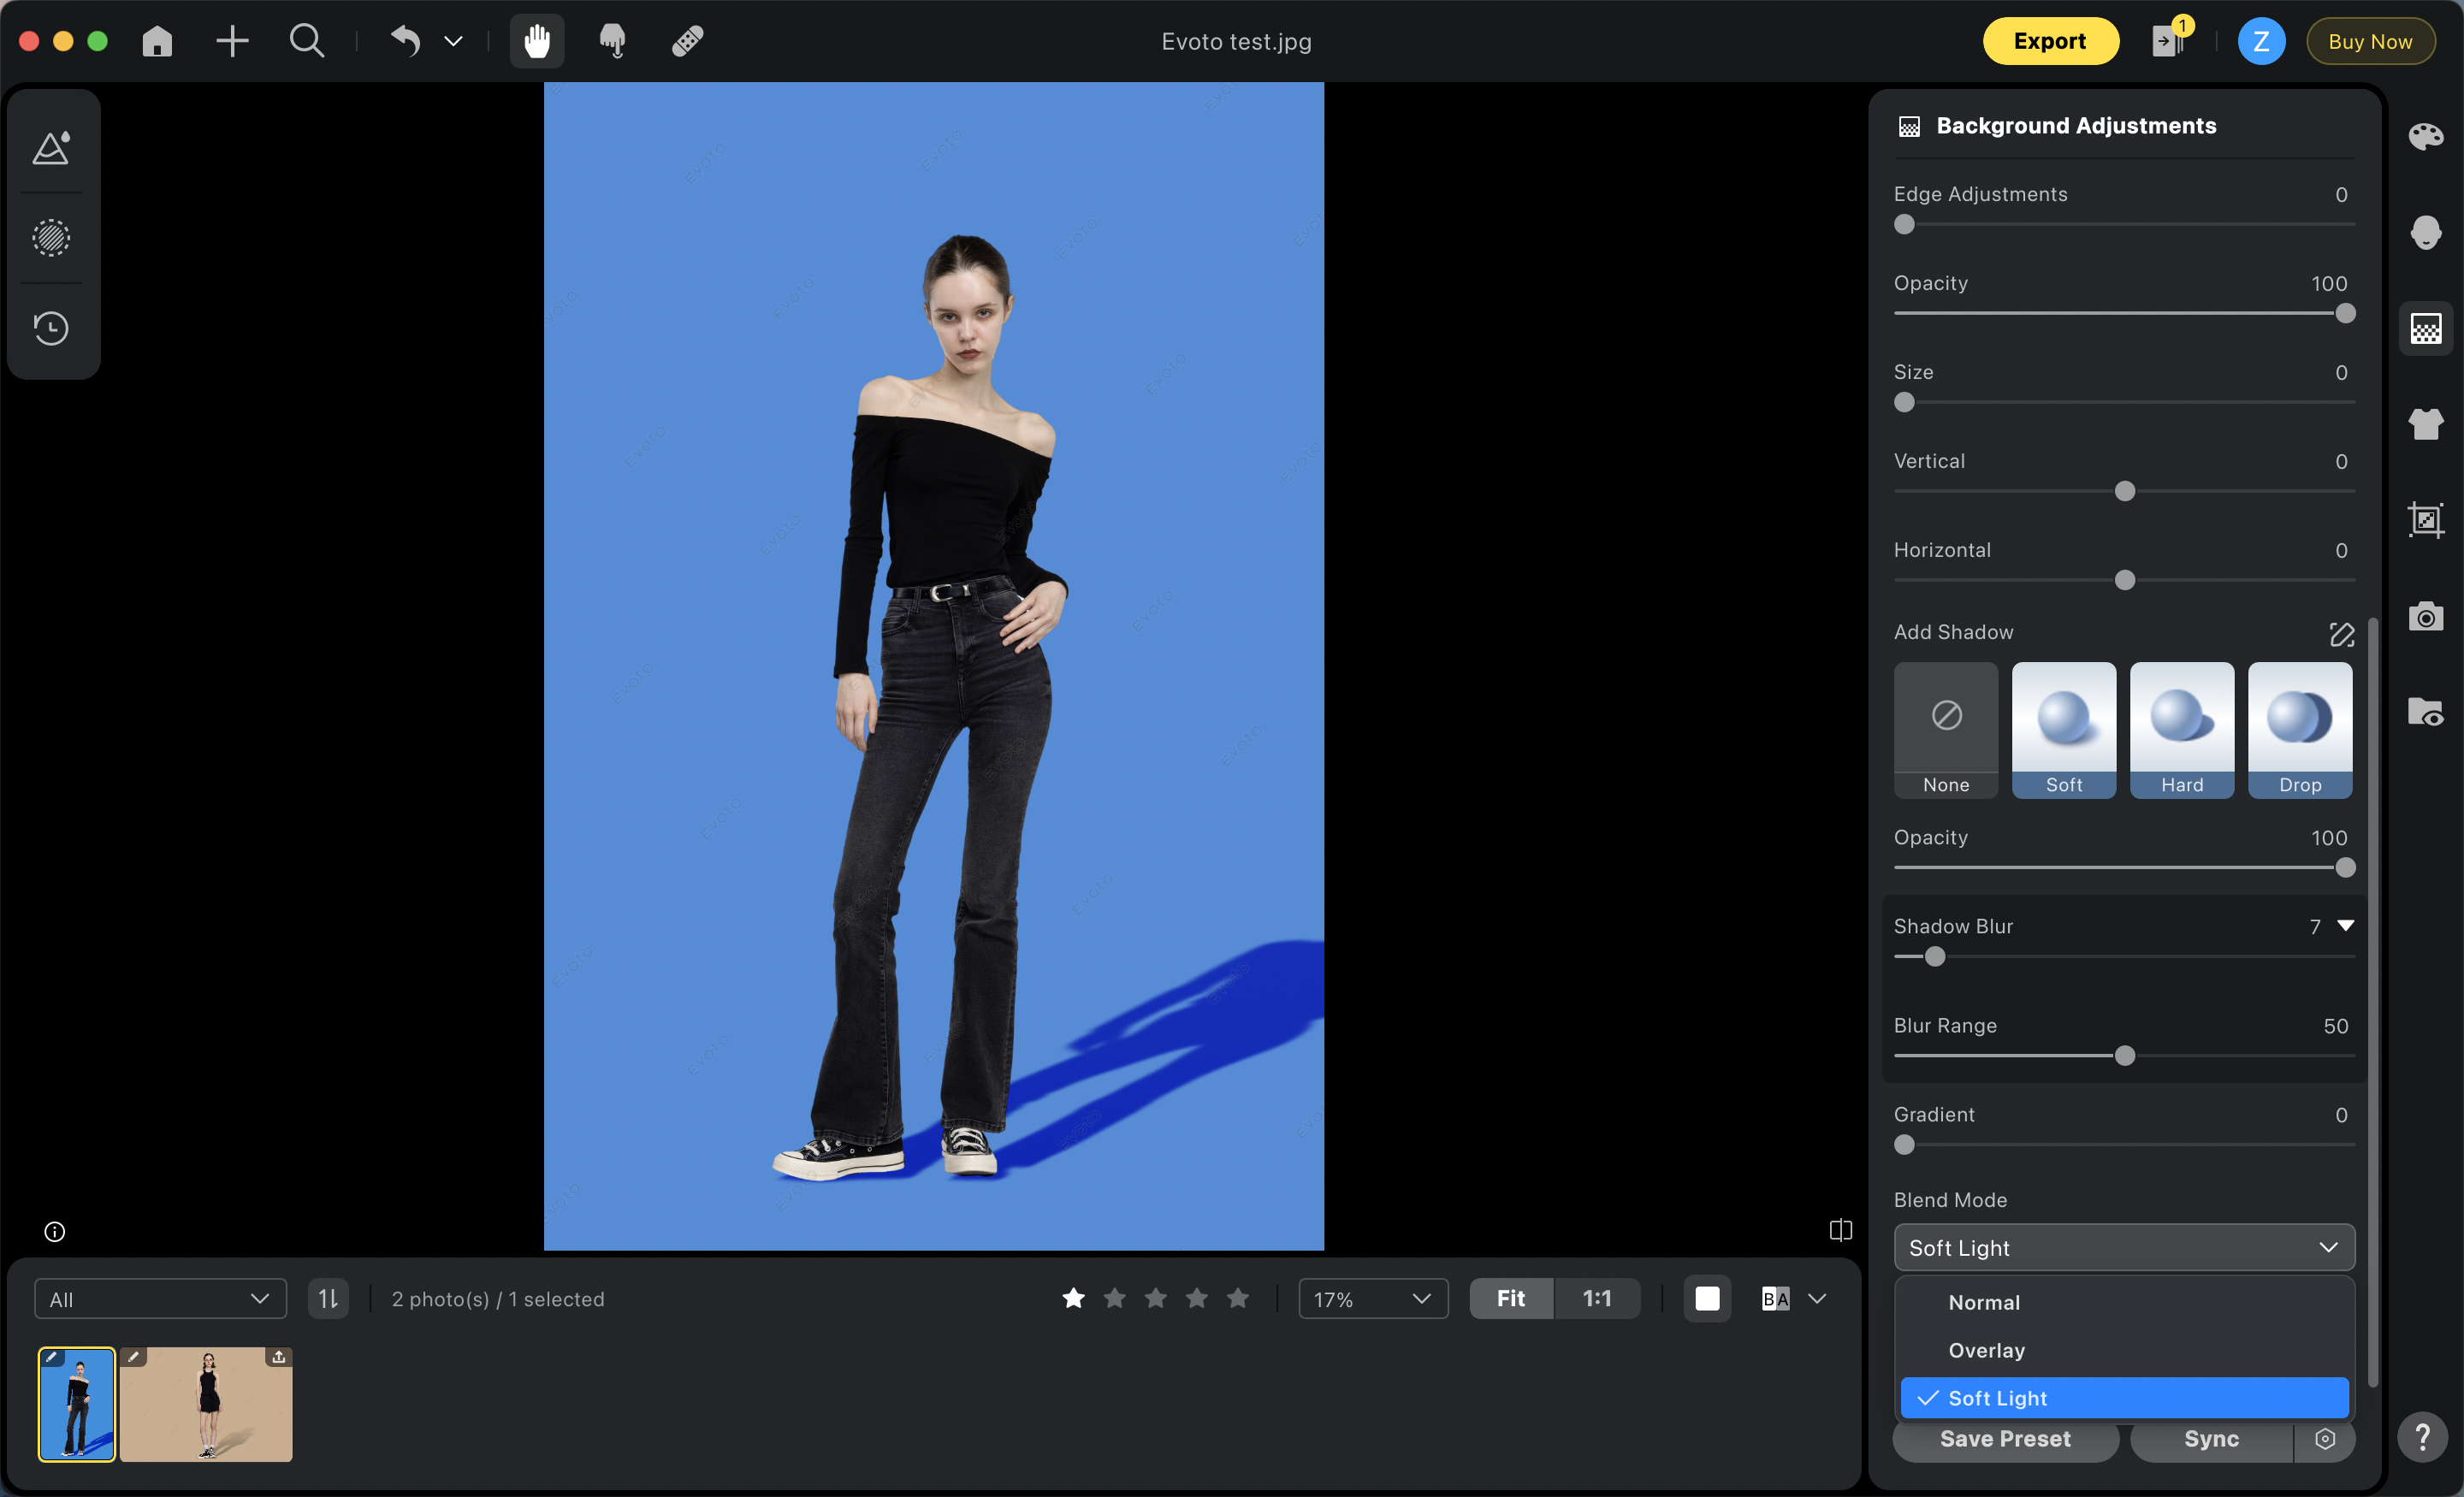
Blend Modes:
The dropdown menu offers 3 blending modes:
Normal: The default blending mode, where the original color and opacity of the shadow remain unchanged.
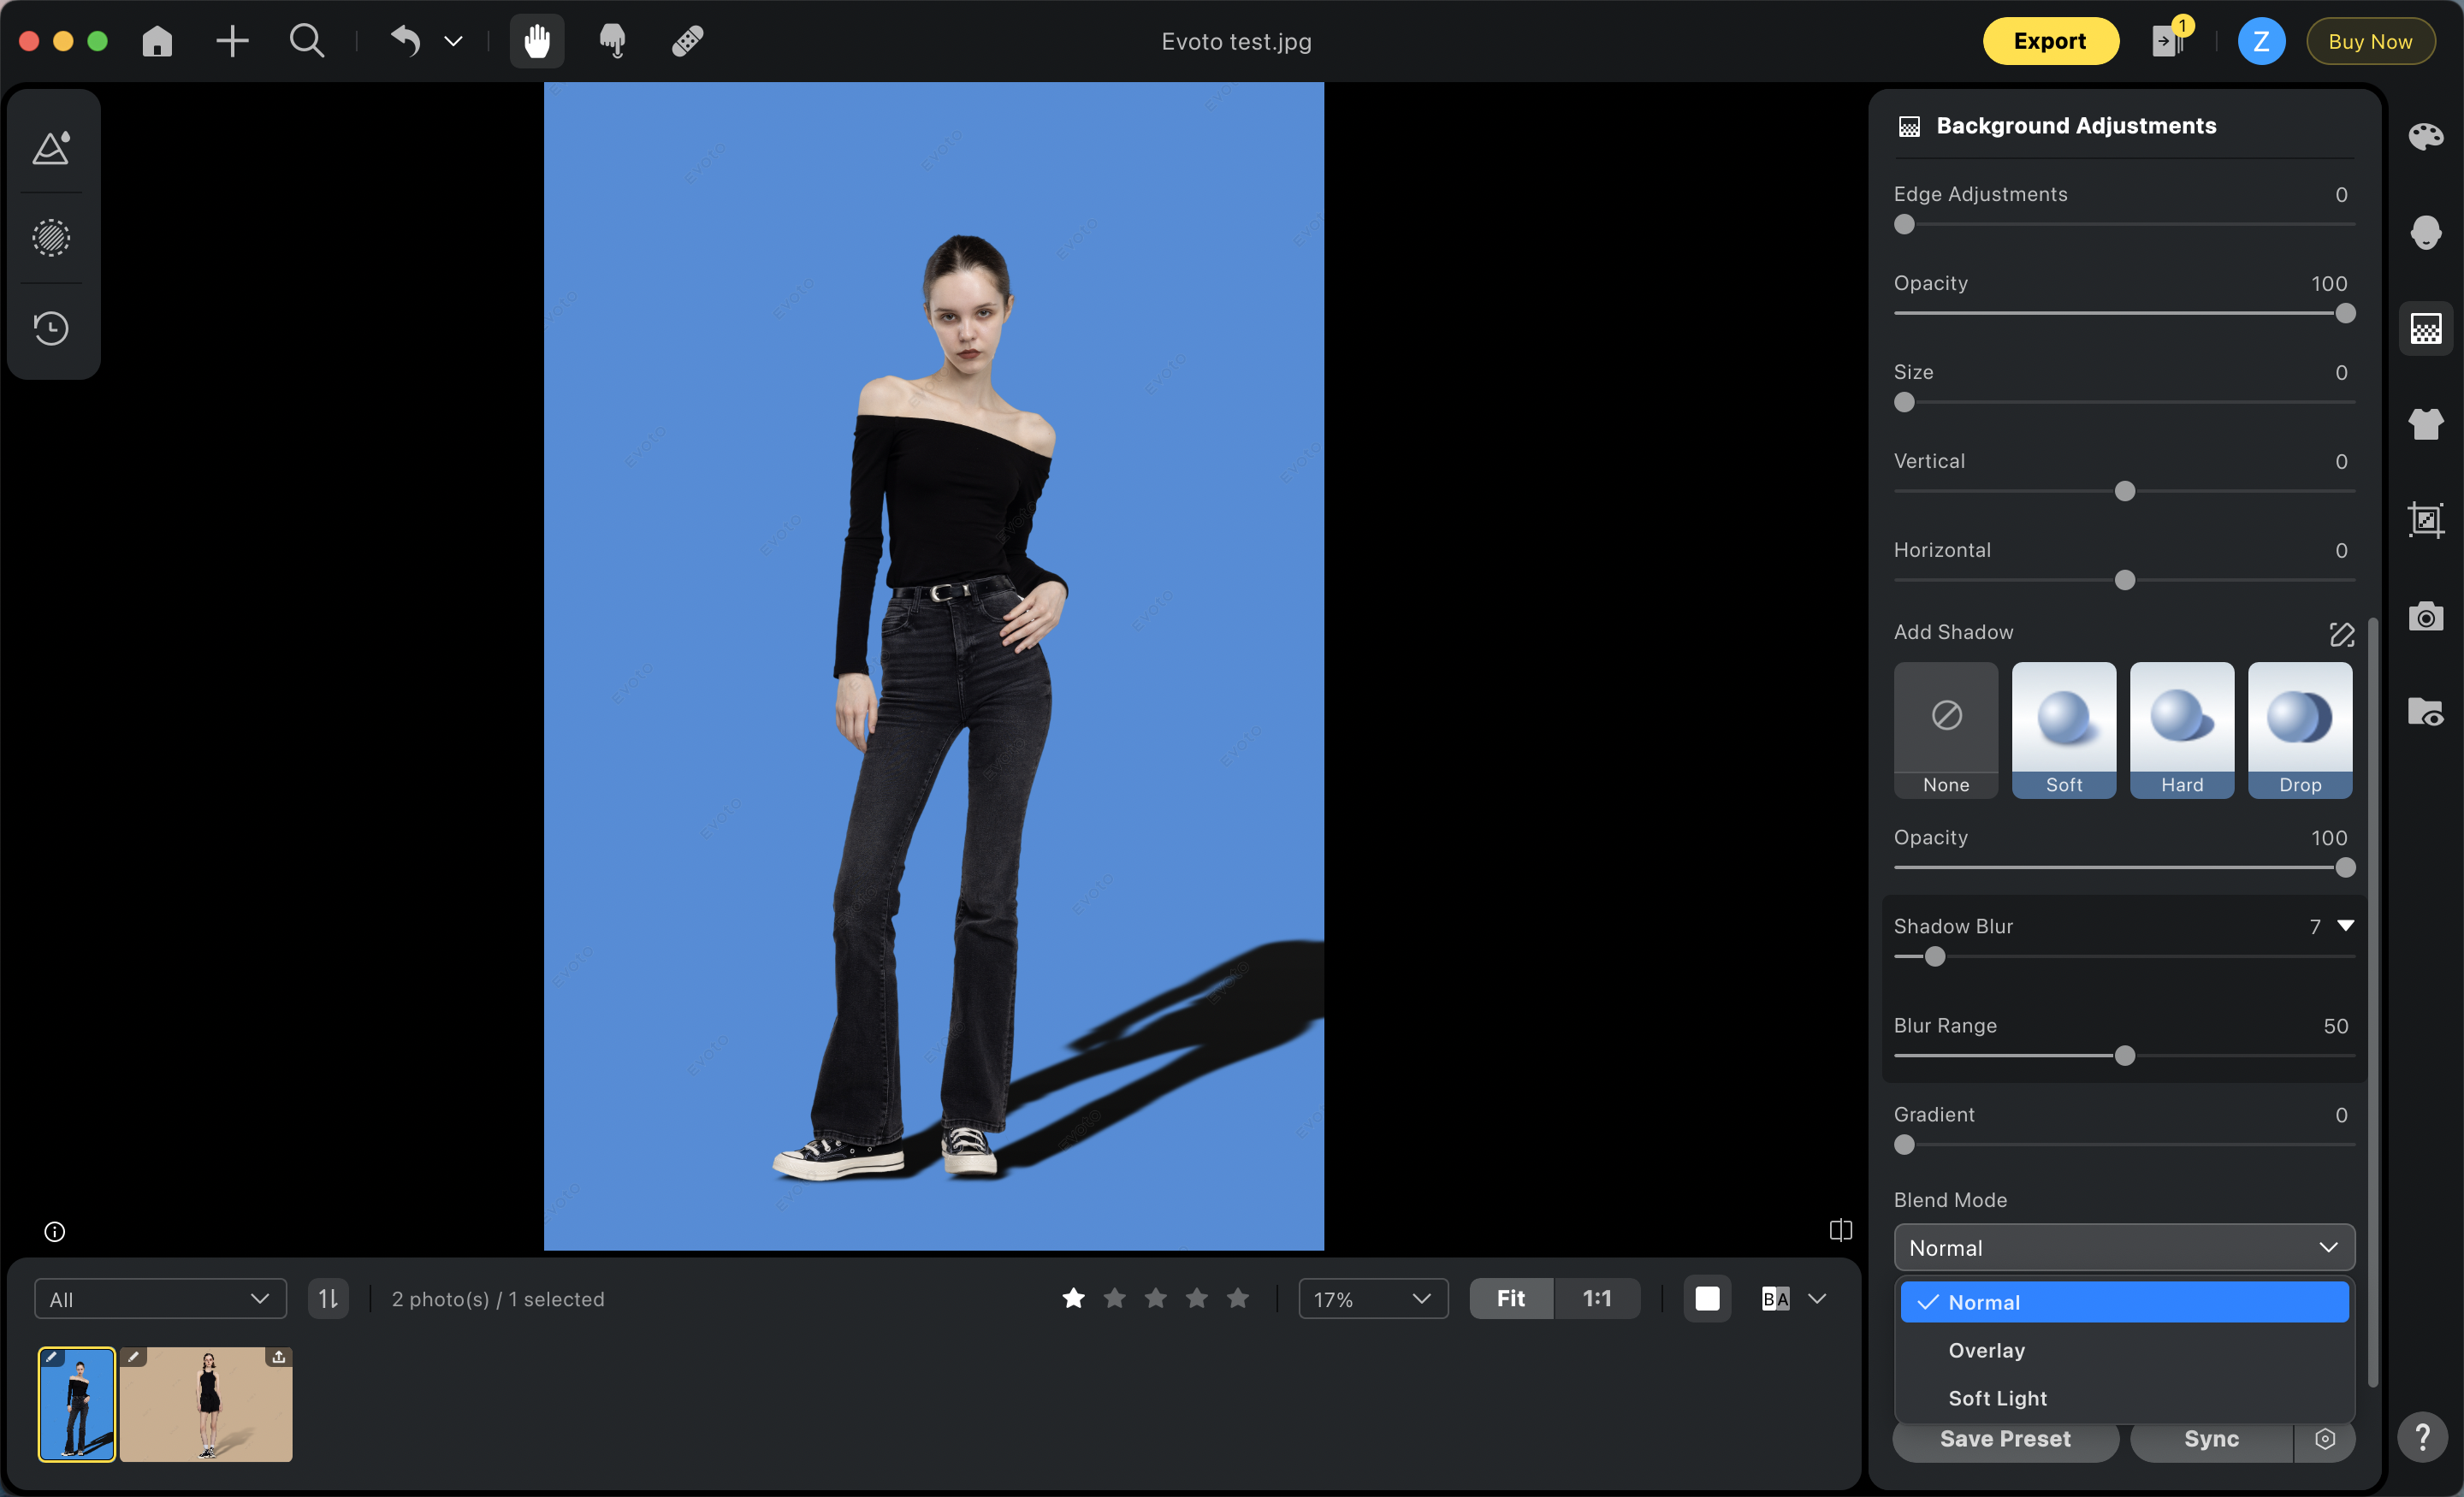
Multiply: In this mode, the colors of the shadows are multiplied with the colors of the background, typically resulting in a darker outcome.
Soft Light: The shadow color will either darken or lighten depending on the underlying color of the background. For example, if the background is pink, the shadow will become darker based on the pink background.
Note: The Soft Light blend mode does not work with a white background.
Shadow Position Adjustment:
After clicking the Manual Tuning brush icon, users will be directed to the Shadow Adjustments panel, where they can adjust the shadow position using both sliders and drag interactions on the image.
Adjusting Shadow Position with Sliders
Under Shadow Position Adjustments, 4 sliders are adjustable:
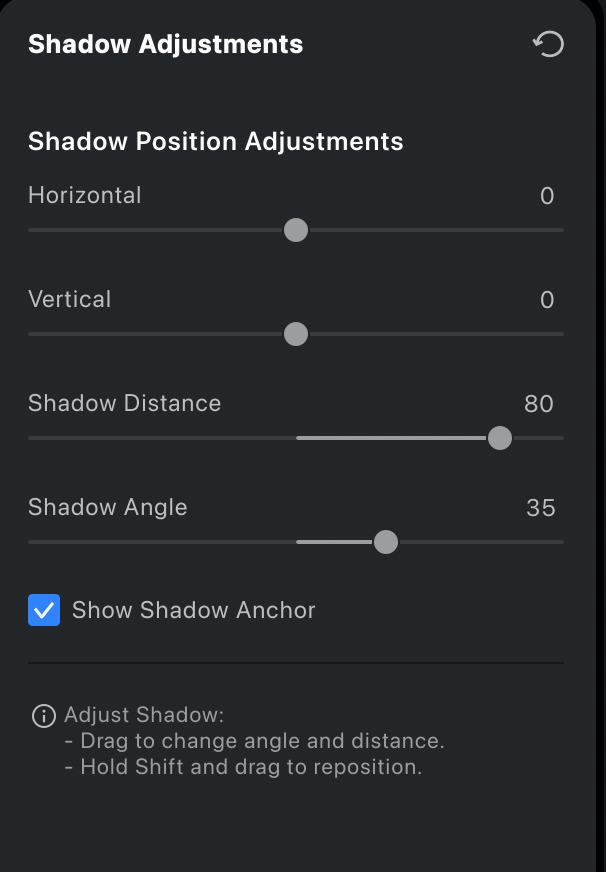
- Horizontal: Move the shadow horizontally.
- Vertical: Move the shadow vertically.
- Shadow Distance: Simulates the effect of light source distance, adjusting the shadow’s length and angle along the horizontal axis. The maximum adjustment supports up to 180 degrees.
- Shadow Angle: Simulates the effect of light source angle, adjusting the shadow’s length and angle along the vertical axis. The maximum adjustment supports up to 180 degrees.
Adjusting Shadow Position by Dragging on the Canvas
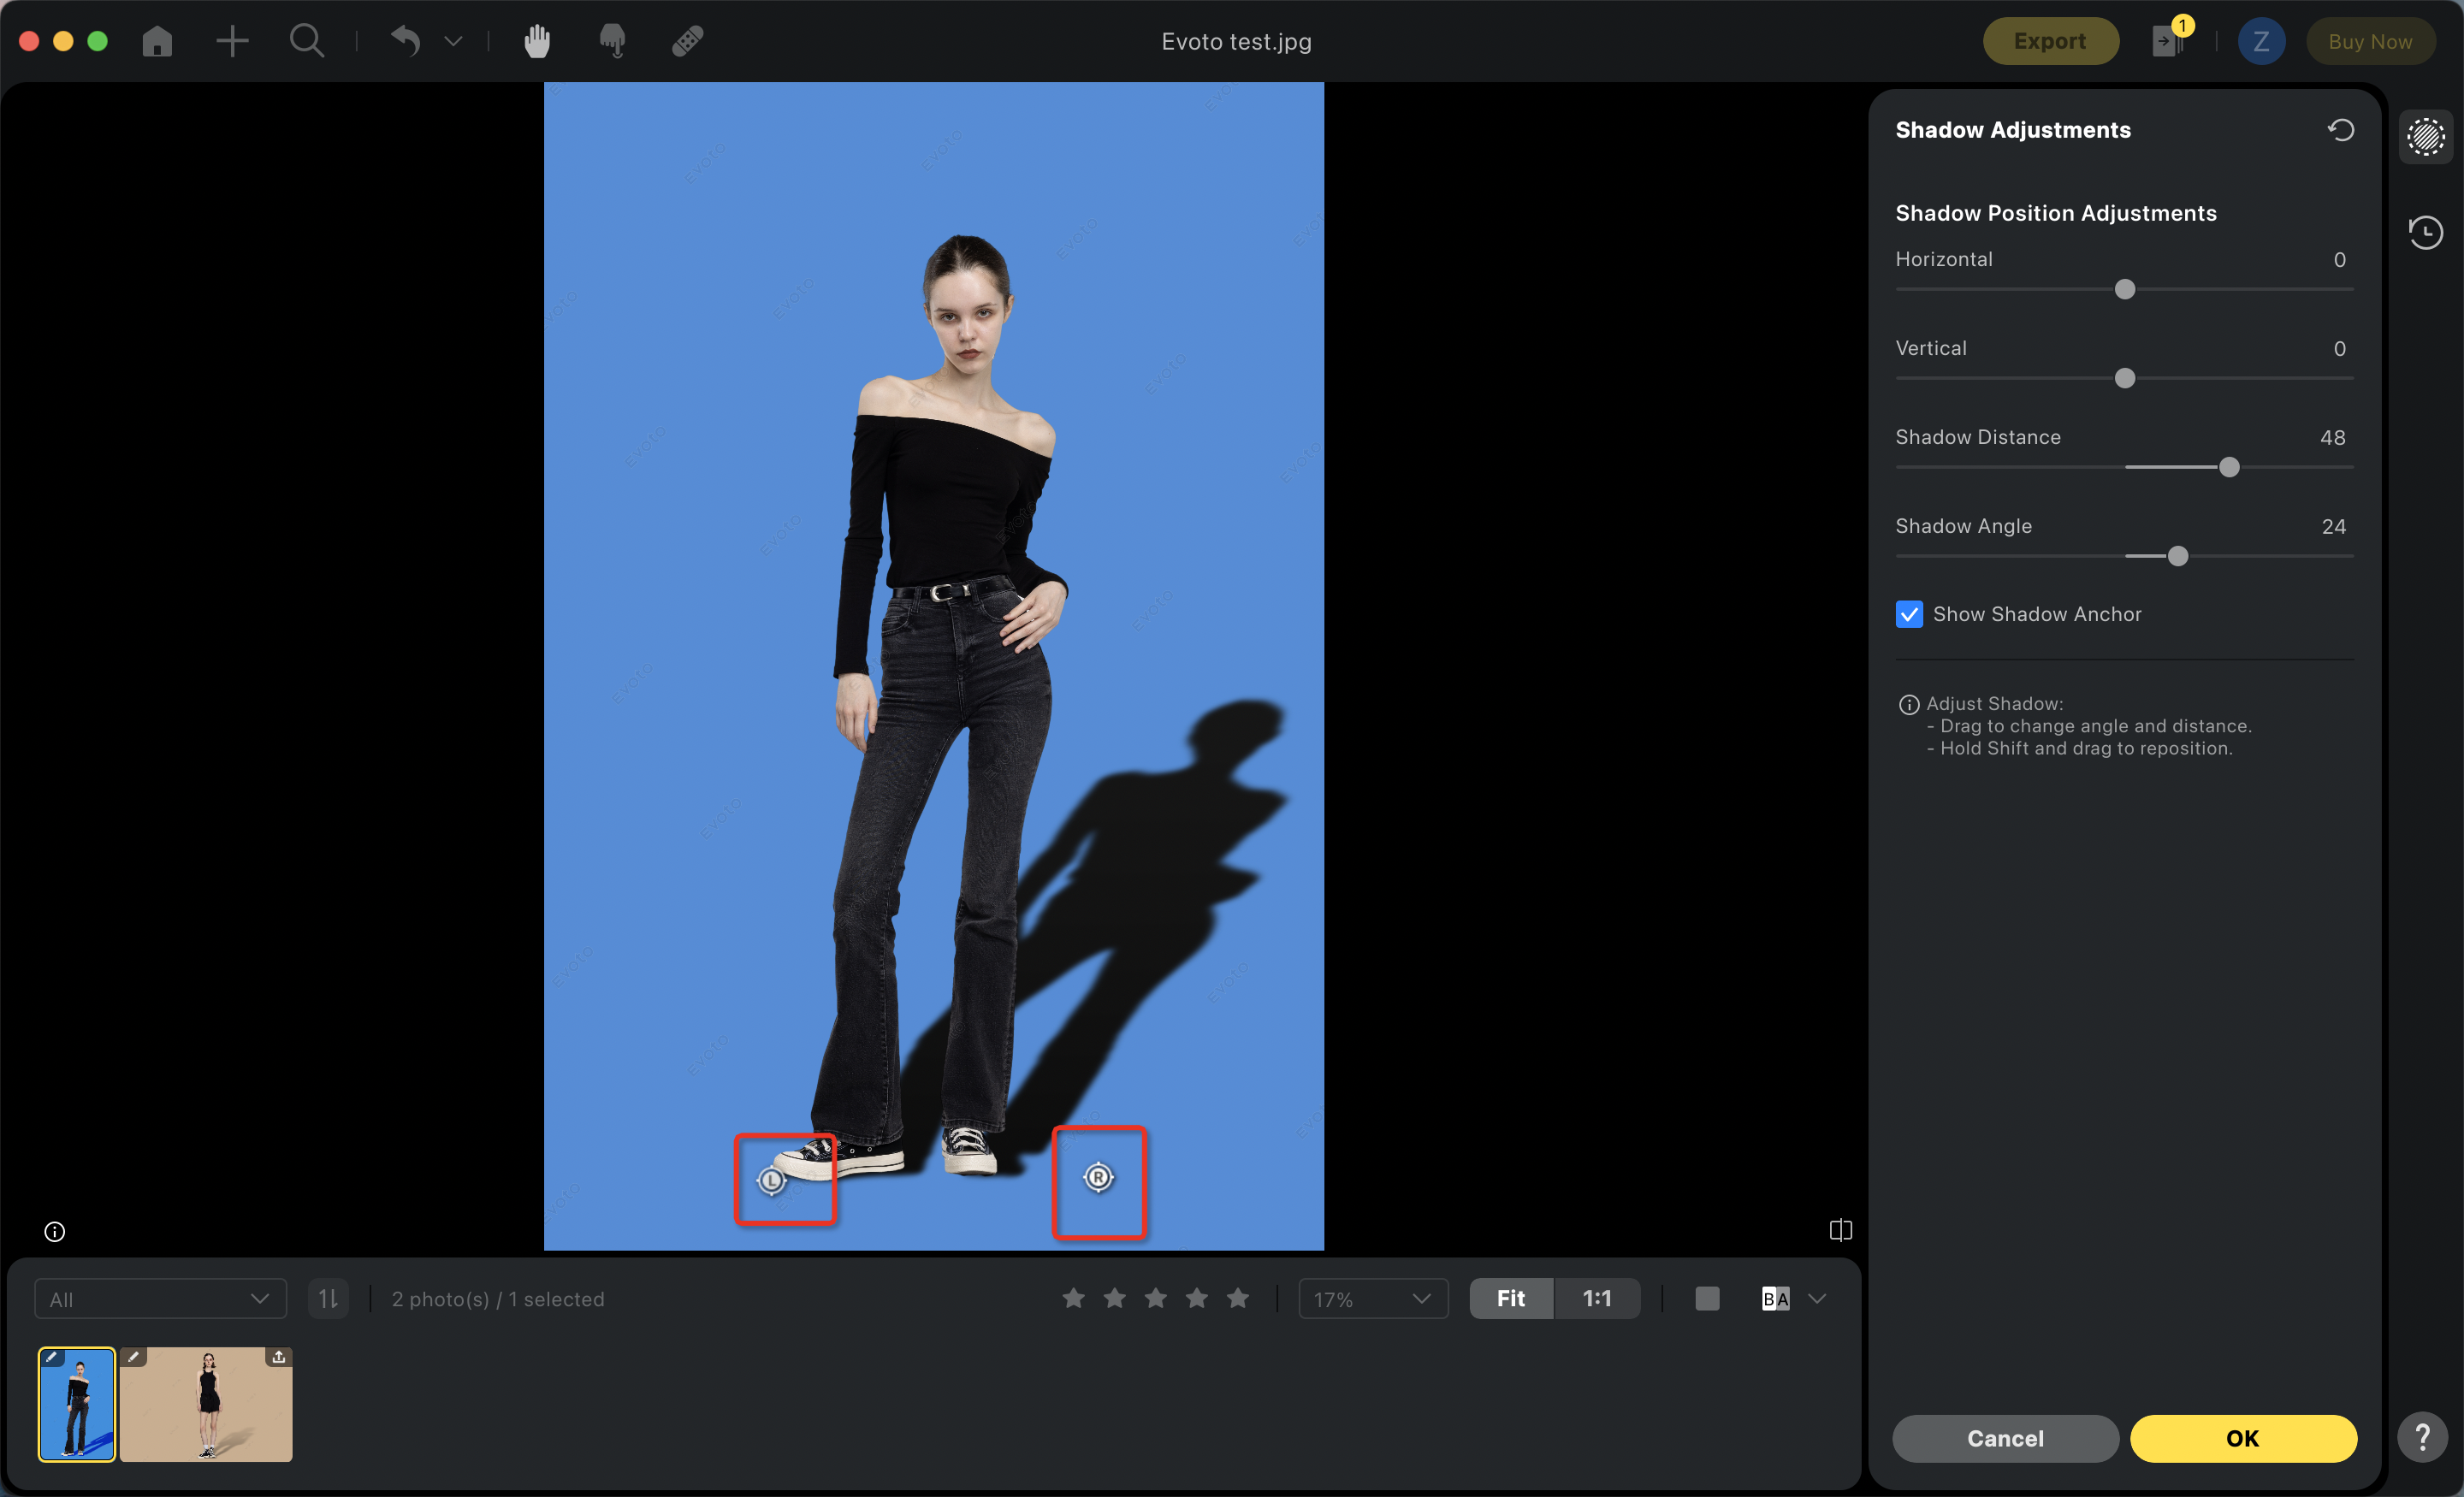
Users can also adjust the shadow’s position, and anchor point on the canvas with a quick drag using the following interactions:
- Hold Shift and drag with the left click to move the shadow horizontally or vertically.
- Drag the shadow with the left click to adjust the distance and angle.
- When the Show Shadow Anchor checkbox is enabled, the current anchor point of the shadow is displayed on the canvas. Hovering over the anchor point will highlight the icon, and the cursor will change to a hand tool, allowing users to drag and adjust the anchor point.
Note: The Show Shadow Anchor checkbox is enabled by default.


