Color Only
The Color Only feature allows you to preview only the color-related changes you’ve made, temporarily hiding all other adjustments that are not related to color. This can be especially helpful when fine-tuning color grading or assessing the impact of specific color edits.
- Enabled: Displays only color adjustments and hides all other effects.
- Disabled: Displays all applied effects in the image.
This feature also supports full-size previews. When activated, the image in the color adjustment panel will appear at full resolution.
AI Color Looks
The AI Color Looks feature offers intelligently generated color grading styles that instantly elevate your photos with visually appealing color tones. These adjustments are tailored to your selected style, helping your work stand out with minimal effort.
- Camera Simulation: Replicates the color characteristics of classic film cameras. Combined with AI White Balance and AI Exposure intelligent algorithms, Camera Simulation adaptively adjusts parameters for different photos, ensuring optimal results across various shooting scenarios. Includes 4 classic camera styles:
- Fuji NC: Strong contrast with high color saturation and bright, magenta-biased skin tones. Best for outdoor scenes under daylight or flash lighting.
- Fuji NN: Soft and gentle with an “amber-like” texture. Ideal for scenes requiring a delicate look.
- Ricoh +: Vivid red tones with pronounced contrast for stronger visual impact. Well suited for street photography and night scenes.
- Kodak Ultramax 400: Warm daylight feel with high saturation and prominent red and orange tones.
- Gentle: Soft, warm tones for a natural and delicate look.
- Tone: Balanced color adjustments for consistent skin tones and overall harmony.
- Film: Classic film-inspired aesthetics with nostalgic color grading.
- Vibe: Atmospheric and mood-driven styles for creative storytelling.
- Trendy: Modern, fashionable looks aligned with current photography trends.
- B&W: Classic black and white conversions with refined tonal contrast for timeless, elegant imagery.
AI Color Match
AI Color Match uses a reference image to transfer its overall color mood to your photo. It is useful when you want a set of photos to share a more consistent visual style without recreating the look manually.
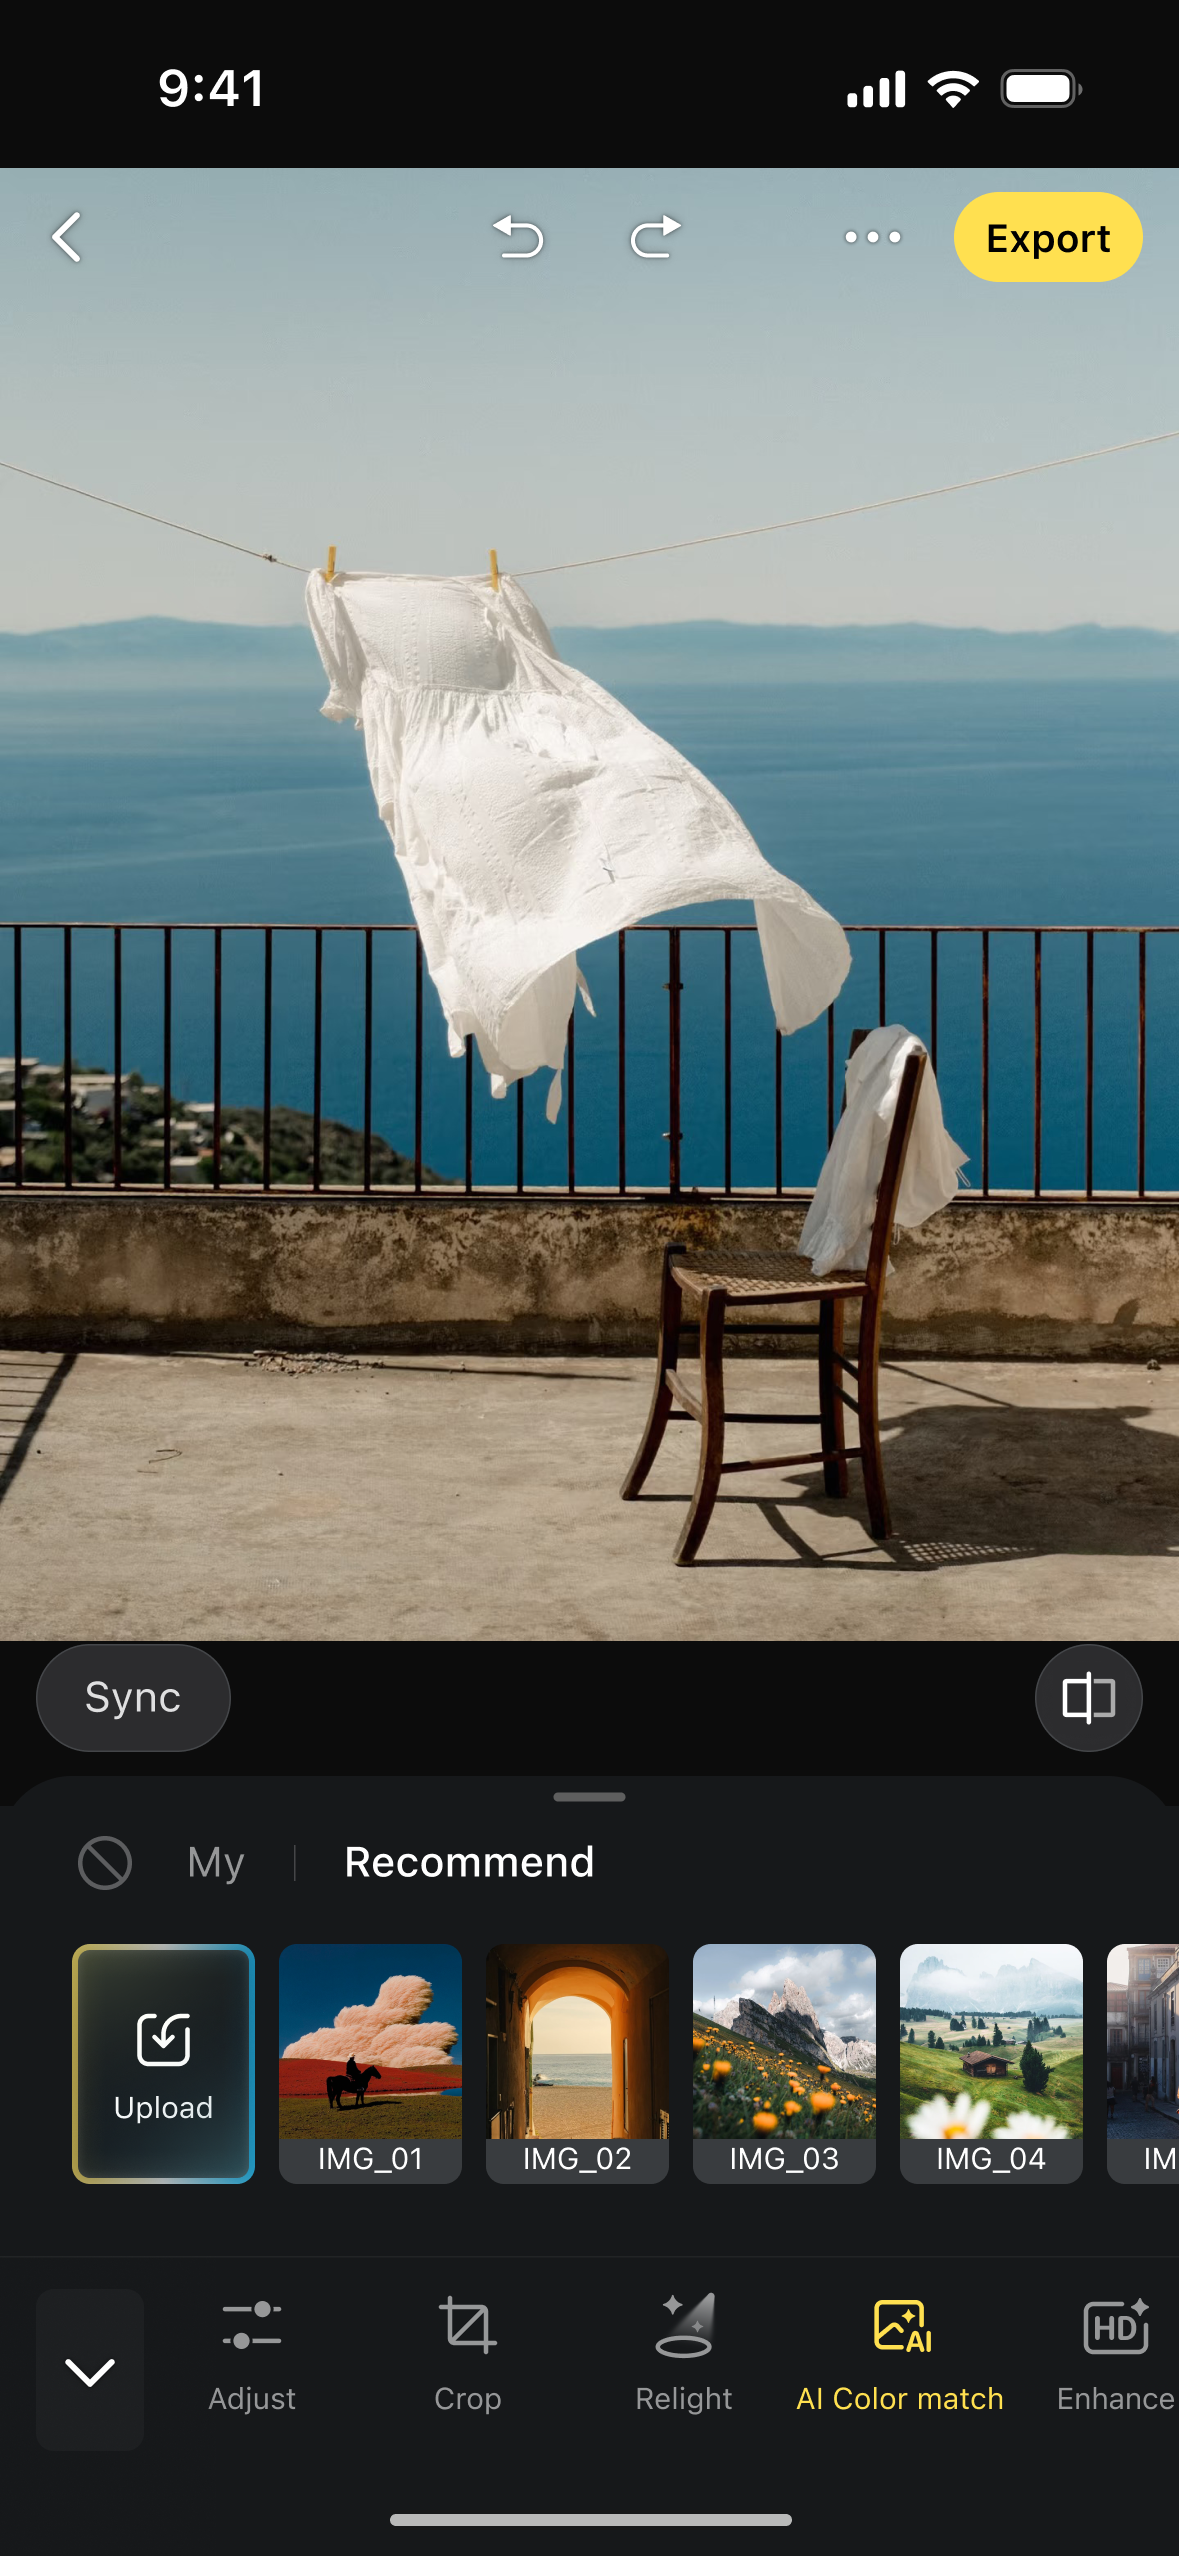
How to Use AI Color Match
- Open a photo in the editing page and go to Color.
- Select AI Color Match.
- Choose a reference image with the color atmosphere you want to use.
- Apply the result, then refine the image with the other Color controls if needed.
For the most predictable results, use a clear reference image with a distinct color treatment and a target photo with balanced exposure.
Filters
Evoto offers a wide range of filters that can be directly applied to your photos to create stylized effects or color themes.
- Each filter’s intensity can be adjusted using a slider
- Click More to explore the full range of available filters
- Filters can be used in combination with other color adjustments for enhanced creative control
Basic
White Balance
White Balance ensures your images maintain natural-looking colors under different lighting conditions. It removes unwanted color casts by making white objects appear neutral and true to life.
White Balance Selector
The White Balance Selector tool lets you manually correct the color temperature and tint of your image:
- Click on an area that should appear neutral white or grey (e.g., white clothing or walls)
- Evoto analyzes the selected area and adjusts the image accordingly to balance the tones and correct color shifts
You can click a single point or drag to select a region. This provides greater accuracy, especially in scenes with mixed lighting.
Tone
Tone plays a central role in photography, influencing the distribution of light and dark areas as well as the overall contrast and mood of an image. Proper tone adjustment can elevate the visual appeal, emphasize emotion, and add depth to your photos. Natural photographs typically feature a range of tones—shadows (darker areas), midtones, and highlights (brighter areas)—that create a layered and compelling composition.
AI Exposure Adjustment
This feature automatically adjusts the Exposure setting based on the brightness of your image. It provides a fast solution to correct underexposed or overexposed photos, giving you a proper starting point for further editing.
Tone Adjustment Controls
- Exposure: Controls the overall lightness or darkness of the image. Adjusting this slider affects the entire image and can significantly improve clarity and quality.
- Contrast: Increasing contrast enhances the difference between light and dark areas, adding vibrancy. Decreasing contrast softens the image and can reveal more subtle textures and details.
- Brightness: Adjusts midtone brightness while maintaining contrast. This produces a more natural and uniform enhancement compared to exposure adjustments.
- Highlight: Adjusts the intensity and tone of the brightest parts of the image, allowing control over light sources or reflective areas.
- Shadow: Adjusts the intensity and tone of the darkest parts of the image, helping to recover detail in shadowed areas or deepen contrast.
- White: Targets the very brightest pixels, affecting overall image luminance.
- Black: Targets the darkest pixels, allowing control over how deep the darkest areas of the photo appear.
Presence
Presence settings enhance the clarity, depth, and color dynamics of your image, making it appear more vivid or stylized based on your creative goals.
- Clarity: Increases midtone contrast, making the image appear sharper and more defined. Reducing clarity creates a softer, dreamier effect.
- Dehaze: Reduces atmospheric haze for a clearer and more detailed image. Drag the slider to the right for clarity and depth, or to the left for a soft, foggy appearance.
- Note: The Dehaze effect is intentionally strong. It’s best to avoid high values to maintain a balanced look.
- Note: The Dehaze effect is intentionally strong. It’s best to avoid high values to maintain a balanced look.
- Vibrance: Enhances less-saturated colors while preserving already vivid ones, resulting in more natural and balanced color enhancement.
- Saturation: Affects the overall color intensity. Lowering saturation mutes colors, while increasing it makes them more vivid and intense.
HSL
The HSL module allows precise control over how each color appears in your image.
- Hue: adjusts where a color falls on the spectrum.
- Saturation: changes the intensity or purity of a color.
- Luminance: modifies the brightness of a color.
Evoto provides controls for eight color ranges: Red, Orange, Yellow, Green, Aqua, Blue, Purple, and Magenta.
Detail
The Detail feature group provides controls to sharpen images and reduce unwanted noise for a clearer, more professional result.
Sharpen
- Sharpen: Enhances edge contrast for a crisper, more defined image.
- Radius: Determines the width of sharpening around edges.
- Detail: Controls how much fine detail is enhanced. Higher values emphasize small details; lower values reduce the sharpening effect.
Noise Reduction
- Noise Reduction: Smooths out grain or digital noise in the image.
- Detail: Higher values remove noise more aggressively. Lower values preserve finer details.
- Contrast: Adjusts the balance between smoothed areas and preserved texture for more natural results.
Color Noise Reduction
- Color Noise Reduction: Eliminates color specks or blotches in low-light or high-ISO images.
- Detail: Sets the threshold for retaining edge color details versus removing color blotches. Higher values retain more detail but may cause color stains.
- Smoothness: Improves the softness of transitions between color areas. Higher values remove noise more effectively but may reduce edge definition.
Grain
The Grain feature lets you apply film-like texture for artistic or vintage effects. You can control how grain appears across tonal ranges and adjust its size, roughness, and color variation.
- Overall Grain Strength: Controls the intensity of the grain effect throughout the image.
- Shadows, Midtones, Highlights: Adjust grain intensity separately for each tonal range.
- Size: Changes the scale of the grain particles.
- Roughness: Controls how fine or coarse the grain appears.
- Color Variation: Introduces color noise variation into the grain, affecting visual texture.
Color Calibration
The Color Calibration group allows you to correct or enhance color tones by adjusting the Hue and Saturation of the three primary color channels — Red, Green, and Blue. This helps fix color shifts or stylize your image for greater visual impact and realism.
Creative Effects
Creative Effects contains finishing tools for shaping the final atmosphere of an image after the main color, retouching, and crop adjustments are in place. These effects can be saved in presets and synced to selected photos when you want a consistent final style across a set.
Glow Effect
Use Glow Effect to create soft-filter, black-mist, and halation looks directly in Evoto. Start from White Mist, Black Mist, or Halation, then refine the result with detailed light-spread controls.
- White Mist: softens the overall image and creates a lighter, airy look.
- Black Mist: adds glow mainly around light sources, highlights, and backlit areas while keeping shadows more controlled.
- Halation: strengthens light sources and creates a more pronounced glowing halo.
Available controls include Intensity, Radius, Threshold, Exposure, Diffusion, and Tint. Turn on Show Glow Mask to preview the highlight areas affected by the glow. This preview is only a visual guide and does not change the exported result.
Glow Effect results are displayed inside Creative Effects and may not appear while you are working in other editing modules.
Post-Crop Vignetting
Use Post-Crop Vignetting to add a dark or bright vignette after cropping. Because the effect is rendered based on the cropped frame, it is useful as a final finishing step for guiding attention toward the subject.
- Amount: controls the direction and strength of the vignette. Negative values darken the edges, while positive values brighten them.
- Midpoint: adjusts how far the vignette reaches toward the center.
- Roundness: changes the shape of the vignette.
- Feather: controls edge softness.
- Highlights: protects or restores brightness in highlighted edge areas.
Post-Crop Vignetting is intended as a creative finishing effect. Lens Vignetting in color adjustments focuses on correcting lens-related vignetting from the original image, while Post-Crop Vignetting is applied after crop for style and composition.
Lens Blur
Lens Blur is available under Creative Effects. It simulates optical depth of field so the subject stands out more clearly from the background without changing the subject itself.
Main Controls
AI Lens Blur: turns the effect on and lets Evoto build an initial depth estimate for the photo. Use Blur Amount to control the blur strength.
Bokeh
Choose a bokeh shape such as Circle, Circle 2, 5-Blade, 8-Blade, or Cat’s Eye. Use Boost to strengthen the bokeh highlight effect.
Focus Range
Use Focus Range to define which depth area stays sharp and which areas are blurred. Turn on Visualize Depth to inspect the depth map and focus transition more clearly.
Manual Refinement
Use Manual Refinement to correct areas where the automatic depth separation needs adjustment.
Notes
- Transparent images are not supported.
- When you switch to certain other editing tools, the Lens Blur preview may be temporarily hidden to keep editing responsive.
- Lens Blur settings can be saved in presets and synced across images.
XMP / CUBE Compatibility
Evoto Mobile supports presets that include .XMP and .CUBE color information when those presets are synced from desktop. This helps keep color styles more consistent across devices.
- Cloud-compatible use: If an XMP or CUBE-based preset is created on desktop and synced to your account, it can be applied on mobile when the required file is available.
- Download behavior: Related XMP content may need to download before the preset is fully applied.
- Use note: This compatibility is designed to preserve the intended look of desktop-created presets rather than provide direct mobile upload of XMP or CUBE files.
Lens Corrections
Lens Corrections help correct lens distortion and edge vignetting for cleaner, more professional images.
- Entry: Edit Page > Color > Lens Corrections.
- For RAW photos, Evoto can attempt to identify the lens profile and apply correction when a matching profile is available.
- You can manually adjust distortion and vignetting when additional correction is needed.
- After correction, continue editing or export the image as usual.
AI Look Hot Ordering
The Hot content order for AI Looks has been refreshed so stronger or more suitable looks appear more prominently. Camera Simulation has also been repositioned in the AI Look category order for clearer browsing.
Mobile Color Tools
On Evoto Mobile, the Color tab contains color presets. Go to Edit for Adjust, AI Color Match, AI Color Looks, and Filters.
For AI Color Match, go to Edit > AI Color Match. Choose a look under Recommended, or upload a reference photo under My References. Use Amount for the overall strength, and Tone and Color for finer changes. You can adjust Global, Subject, and Background separately. The result can be synced or saved in a preset.
Presets synced from Evoto Desktop can display more than one local-adjustment mask. Masks cannot be created on Mobile.