Evoto provides flexible options for customizing the quality of your exported images, ensuring you get the desired output every time. This guide will help you understand how to optimize your image quality and file size by fine-tuning the available settings.
For more in-depth information, see our full page on Importing & Exporting.
Choosing the Right File Format
Evoto supports multiple image formats, each with a different purpose.
- Original Format: This option exports your image in its original file format. If you have made edits to a RAW file, it will be exported as a JPEG. If the image contains an alpha channel (such as a transparent background), it will be exported as a PNG.
- JPG (8-bit): The ideal format when file size is a concern, such as for web use, social media, and online sharing. JPG uses compression, which reduces file size at the cost of some image detail.
- TIFF (8-bit / 16-bit): The best choice for high-quality, lossless images. TIFF is a professional format that preserves all image data by avoiding compression, making it ideal for further editing or professional printing and archiving.
Controlling Quality and File Size (for JPG Exports)
The quality setting in Evoto is available when exporting in JPG format and allows you to balance image quality with file size.
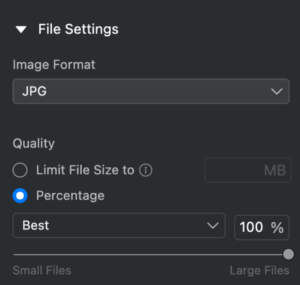
- Percentage-Based Quality Settings: Evoto uses a percentage-based slider for precise control over quality. You can choose from predefined levels:
- Low, Medium, High, or Best
- Alternatively, use the slider to set a specific percentage.
- Note: If you set the percentage too low, Evoto will still export the image at a minimum quality of 20% to ensure the image remains usable.
- Limit File Size: Evoto allows you to set a specific target file size (e.g., “500 KB”). The export algorithm will then compress the image to get as close as possible to your specified size.
- Important: The final file size may not match the input size exactly due to the nature of image compression. The algorithm will do its best to meet your requirements while protecting image quality.
Adjusting Output Sharpening
Evoto includes tailored Output Sharpening Settings to optimize your images for their final use, whether for screen display or print.
| Setting | Result |
| For Screen – Low | Soft, natural results with good detail protection |
| For Screen – Standard | Clear edges, with well-controlled artifacts |
| For Screen – High | Intense but clean sharpness, with minimal oversharpening artifacts |
| For Print – Low | Suitable for A4-sized output |
| For Print – Standard | Rich detail for A3 prints |
| For Print – High | Ideal for large-format or exhibition-quality output |
| No Sharpening (default) | No additional sharpening applied on export |
Adjusting Resolution & Dimensions
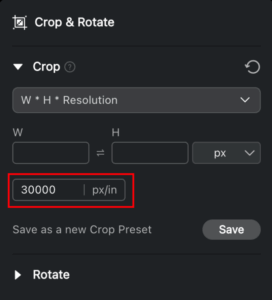
When you crop or resize an image, paying close attention to resolution settings is key to maintaining clarity.
- Resolution for Cropping: When using the W × H × Resolution cropping setting, you can optimize the clarity of your final image by increasing the px/in (pixels per inch) value. By default, this is often set to 300, but you can increase it up to 30,000 to ensure a high pixel density is maintained during the cropping process, which is especially important for print-quality work.
- Other Scaling Options: For resizing, you can also use other scale types like Percentage, Width & Height, or Long Edge/Short Edge to define the final dimensions of your exported image.
By fine-tuning these settings, you can achieve the best balance between quality and file size for any purpose, ensuring your images are exported from Evoto with maximum quality.


