This guide covers the manual import and export of images within Evoto. If you are looking for information on automated workflows using hot folders, please refer to our dedicated Auto Import & Export guide.
Evoto Supported File Types
Evoto supports a wide range of image formats, including JPEGs, TIFFs, and PNGs. We also provide robust processing for most camera RAW file types, powered by our own advanced RAW engine. We regularly update our library and make improvements to ensure perfect support for new cameras as they are released.
Please note that Evoto currently does not support image files larger than 1 GB or with dimensions exceeding 12,000 x 12,000 pixels.
Number of Files Supported for Import
While Evoto doesn’t limit the total number of photos you can import into a single project, there is a limit on the number of photos you can import at one time. You can import up to 15,000 photos per import session.
Importing Images
Evoto offers various methods to import individual files or entire folders, making it easy to bring your images into your workspace.
Importing in the Library Workspace
The Library Workspace provides multiple entry points for starting new projects or adding to existing ones.
Create New Project:
- Start by clicking the “Create New Project” button from the Library Workspace.
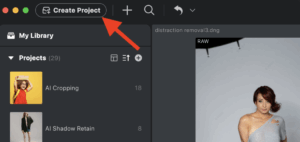
- When prompted, name your new project in the pop-up window.
- The new project page will display a variety of options for importing images:
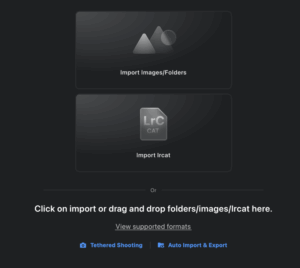
- Import Images/Files:
- Click on the “Import Images/Folders” box to navigate and select your files. Alternatively, you can drag and drop files or folders directly onto this interface.
- Import .lrcat (Lightroom Catalog):
- Drag and Drop: Directly drag and drop the .lrcat file into Evoto.
- Via New Project: Alternatively, create a new project and select the .lrcat file from the import options.
- Once imported, you can choose which collections or filtered sets within the catalog to import into Evoto.
- Note: Projects based on .lrcat files are visibly marked within your project list for easy identification.
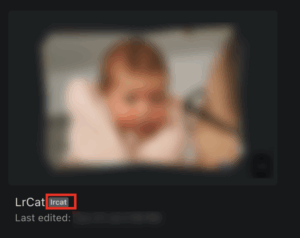
- Lrcat Import Options:
- Import Settings from .lrcat: Enable this option if you want Lightroom’s basic color sliders (e.g., Exposure, Temp, Tint) to carry over into Evoto.
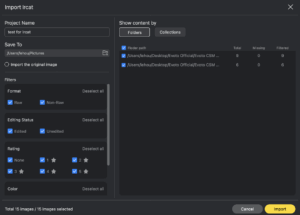
- Important: Only values that directly match Evoto’s tools will be imported, and some color representations may not match exactly due to differing rendering engines.
- What Does “Color Setting” Mean? Color settings, in this context, refer to numeric slider values from Lightroom, not their visual representation. Certain Lightroom adjustments will not transfer to Evoto, including:
- Perspective correction
- Lens blur
- Local adjustments
- Advanced masking
- Tethered Shooting:
- For information on importing directly from a connected camera, please refer to our Tethered Shooting guide.
- Auto Import & Export:
- For automated importing via hot folders, please refer to our Auto Import & Export guide.
- For automated importing via hot folders, please refer to our Auto Import & Export guide.
Importing into an Existing Project:
- First, open your desired project in the Library Workspace.
- Click the Plus + button in the upper left corner. This will open Finder on a Mac or File Explorer on Windows, allowing you to navigate to and select your files.
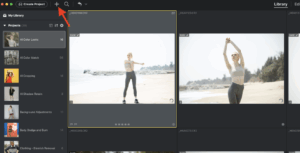
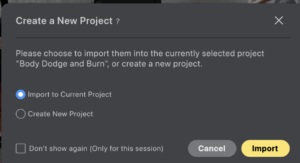
- Additionally, you can drag and drop images directly into an open project window. The system will prompt you, asking if you want to import into the current project or create a new project.
Importing in the Edit Workspace
To import additional images into an open project while you are already in the Edit Workspace:
- Click the Plus + button in the upper left corner of the Edit Workspace. This will open Finder (Mac) or File Explorer (Windows) to allow you to navigate to your files.
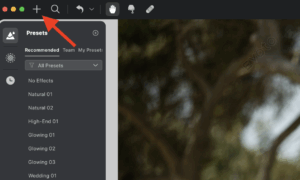
- Alternatively, you can drag and drop images directly onto the interface. They will be added among the existing image thumbnails at the bottom of the screen.
Additional Import Methods
Evoto offers convenient import options from outside the application:
- Right-Click in File Explorer/Finder: Right-click on an image file and navigate to Open With > Evoto.
- Drag and Drop onto App Icon: Drag images directly onto the Evoto application icon (Windows taskbar drag-and-drop is not supported).
- Right-Click from Other Software: Send images directly to Evoto from compatible photo editors like Lightroom by using the Right Click > Edit In Evoto option.
Exporting Images
Evoto provides comprehensive export options and advanced controls, ensuring your final images meet your desired quality, format, and naming standards. Evoto allows export back into Lightroom Catalogs with multiple options for file placement and compatibility. For a detailed walkthrough of the Export Panel, check out our video tutorial.
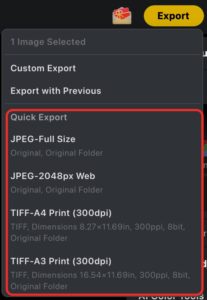
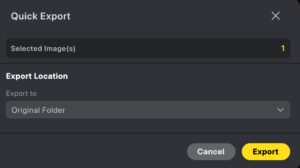
Evoto has improved the usability of the export workflow, supporting two modes: Quick Export and Custom Export (Original Full Export Dialog).
Click the Export to Open the Export Menu:
-
Shows the number of selected photos for export
-
Export as Catalog (.lrcat): Available if the project is a .lrcat catalog
-
Custom Export: Opens the full export dialog
-
Export with Previous: Exports using the last export settings
-
Quick Export: Opens a streamlined dialog for selecting the export location based on chosen presets
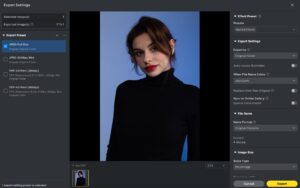
Full Export Dialog Layout
-
Left Panel: Number of photos to export and choose export presets
-
Center: Preview image
-
Right Panel: Export settings
Export Queue Information
When you open the export dialogue, you’ll see key information about your export queue in the left panel:
- Selected Image(s): This display shows the total number of images selected for export.
- Exported Image(s): This display shows the total number of images selected for export (first number) multiplied by the number of times each image will be exported (second number), based on the amount of export presets chosen. If no export presets are chosen, the number of times exported will default to one.
Export Presets
Export Presets allow you to save and manage configurations for various output resolutions and settings. This is ideal for quickly applying consistent export standards.
- Save a Preset: To save an Export Preset, click the + button > Create Export Preset. Name it as needed.
- Applying Presets: Multiple export presets can be selected and applied simultaneously. Evoto will automatically export separate versions of each image for every selected preset.
- Note: Any changes made to export settings when an Export Preset is actively selected will automatically update that preset to the new settings.
Effect Preset (for Export)
This option allows you to apply an effect preset during the export process, especially useful if images haven’t been edited yet, or for automated workflows.
- If you haven’t already edited an image, an Effect Preset can be applied to exported images. This is ideal for auto import & export workflows with very controlled image settings.
- If images are already edited, the system will default to “Applied Effect” in this section, meaning it will apply the edits currently on the image.
- Note: An additional Effect Preset can be applied even if the image is already edited, and Evoto will generate separate versions for each selected style.
Export Settings
Configure the fundamental aspects of your export, including destination and file handling.
- Export To: Set your desired export location on your computer or connected drive.
- Auto-Create Subfolder: Automatically creates a named subfolder within your chosen export location for the exported files, helping you stay organized.
- When File Name Exists: Choose how Evoto handles existing files with the same name in the destination folder:
- Add Suffix: Adds a number to the filename to create a unique version (e.g., image_01.jpg, image_02.jpg).
- Skip: Skips exporting the file if a file with the same name already exists.
- Replace: Overwrites the existing file with the new export.
- Path: Displays the full file path where your images will be exported.
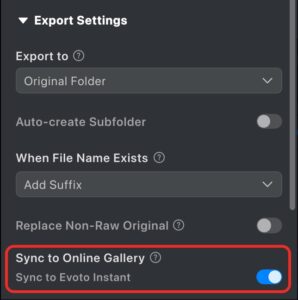
- Sync to Evoto Instant: Exported photos can be synced to Evoto Instant to generate online links.
-
First-time using Sync to Evoto Instant requires agreeing to Instant’s cross-product user agreement and privacy policy.
-
Users without an existing Instant account will automatically have one created.
-
File Naming Methods
Evoto provides several flexible file naming options to organize your exports:
- Original Filename: Keeps the original name of the image file.
- Custom Filename (# of #): Adds a custom name and includes a numbered sequence (e.g., MyShoot (1 of 10)).
- Capture Date – Original Filename: Prepends the capture date to the original filename (e.g., 20240730_IMG_1234.JPG).
- Custom Filename – Sequence: Adds a numbered suffix to a custom filename (e.g., Event_001.JPG, Event_002.JPG).
- Original Filename – Custom Text: Adds custom text to the end of the original filename (e.g., IMG_1234_Retouched.JPG).
- Original Filename – Preset Name: Adds the name of the Effect Preset (applied during editing or export) at the end of the original filename (e.g., IMG_1234_Portrait.JPG).
- Original Filename – Export Preset: Adds the name of the Export Preset (the resolution/quality preset applied in the export window) at the end of the original filename (e.g., IMG_1234_WebRes.JPG).
- Original Filename – Preset Name – Export Preset: Combines the Effect Preset name and the Export Preset name at the end of the original filename (e.g., IMG_1234_Portrait_WebRes.JPG).
- Original Filename – Preset Name – Custom Text: Adds the name of the Effect Preset and custom text at the end of the original filename.
Image Size
Control the dimensions and resolution of your exported images:
- Scale Type: Scale your image exports by:
- Percentage: Adjusts size relative to the original.
- Width & Height: Set specific pixel dimensions.
- Dimensions: Set specific pixel dimensions (alternative label for Width & Height).
- Long Edge and Short Edge: Define the size of the longest or shortest side of the image.
- You can also set the image resolution for print or display purposes by:
- Pixels/Inch (PPI)
- Pixels/Centimeter (PPC)
File Settings
Choose your desired image format and quality:
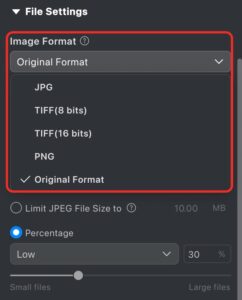
- Image Format: Select your output format from the following:
- Original Format:
- Note: RAW images will be exported as JPEG. If the image contains an alpha channel (like a transparent background), it will be exported as a PNG.
- JPG (8-bit)
- TIFF (8-bit / 16-bit)
- PNG
- Original Format:
-
- Note: For information about exporting PNG files with transparency, please refer to PNG Guide
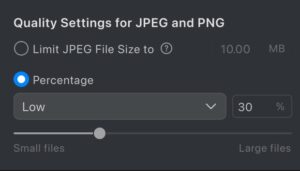
Quality (Only available for JPG exports):
-
- Limit File Size: Input a target file size (e.g., “500 KB”), and Evoto will compress the image as closely as possible to that value while maintaining visual quality.
- Percentage: Choose from predefined quality levels: Low, Medium, High, or Best, or use the slider to adjust the quality percentage manually.
Export Adjustments
Evoto includes tailored Output Sharpening Settings to optimize your images for their final use, whether for screen display or print.
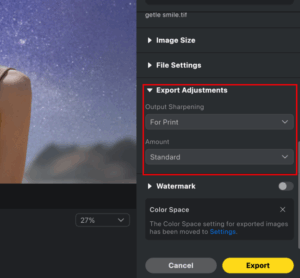
- Options:
- For Screen: Low / Standard / High
- For Print: Low / Standard / High
- No Sharpening (default)
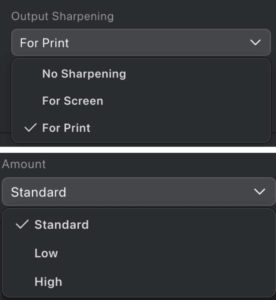
| Setting | Result |
| For Screen – Low | Soft, natural results with good detail protection |
| For Screen – Standard | Clear edges, well-controlled artifacts |
| For Screen – High | Intense but clean sharpness, minimal oversharpening |
| For Print – Low | Suitable for A4-sized output |
| For Print – Standard | Rich detail for A3 prints |
| For Print – High | Ideal for large-format or exhibition-quality output |
Watermark
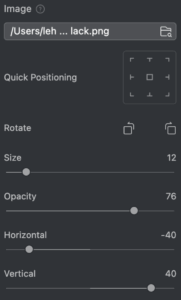
Apply a custom watermark to your exported images:
- Upload a watermark image and customize its appearance:
- Rotation: Adjust the angle of the watermark.
- Size: Control the scale of the watermark.
- Opacity: Set how transparent or solid the watermark appears.
- Position: Choose where the watermark is placed on the image.
Exporting Lightroom Catalogs (.lrcat)
For projects originally imported as a .lrcat file, Evoto allows you to export your edited images and metadata back into Lightroom Catalogs, with multiple options for file placement and compatibility.
- To enable catalog export, you must first import a .lrcat project into Evoto. Creating a .lrcat project directly in Evoto is not currently supported.
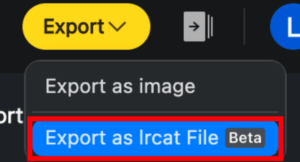
- To Export: Select all images you want exported in your new .lrcat file, then go to Export > Export as .lrcat file.
- Export Options:Original .lrcat Folder: Exports to the folder containing the original .lrcat file and adds a stack in Lightroom (treating the Evoto edit as a virtual copy).
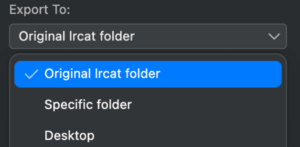
- Specific Folder: Creates a new .lrcat file with the edited images and metadata in a chosen location. Lightroom will treat the edited image as a new file and apply Evoto’s adjustments.
- Desktop: Same behavior as “Specific Folder,” but saves the new .lrcat file directly to your desktop.
- Handling Non-RAW Images: When exporting edited non-RAW images back to Lightroom, you can choose to replace the original file. Evoto automatically backs up the original image to allow future adjustments or restoration.
- Color Parameter Synchronization:
- Import: Enable the checkbox to sync basic color settings from Lightroom to Evoto upon import.
- Export: Enable the checkbox to sync Evoto’s color adjustments back into Lightroom upon export.
Import & Export Troubleshooting
If you encounter issues during the import or export process, refer to the common problems and solutions below.
Blurry Image Preview After Import
If your images appear blurry after being imported into Evoto, this is typically due to preview settings and is not a reflection of the image’s actual resolution.
- Evoto supports all RAW file types and does not reduce the resolution of your original images.
- The preview quality is automatically adjusted based on your computer’s specifications to optimize performance, which may result in a lower display resolution.
To improve preview clarity:
- Go to Settings → Preview → Preview Size.
- Increase the preview size as needed—Evoto supports up to 4000 px, the maximum preview resolution currently available.
- Note: The preview size setting affects only how the image is displayed within Evoto. It has no impact on the quality or resolution of exported images.
File Size Changes After Export
You may notice a difference in file size after exporting an image from Evoto. This is expected behavior and is typically due to the following:
- Evoto uses optimized image processing algorithms that can alter the internal pixel structure during editing.
- These changes may result in smaller or larger file sizes depending on the content, export format, and settings used.
Despite file size variations, the exported image will always maintain the quality and resolution specified by your export configuration.
Exported Image Not Found in Destination Folder
If an exported image does not appear in the selected folder, the issue is likely related to file permissions.
- Please check the following:
- Confirm that the destination folder or drive allows Evoto to write files.
- Some external drives or system-managed folders (e.g., system folders, network drives) may restrict write access, allowing only read access by default.
- Ensure that Evoto has the necessary write permissions for the selected export location. Granting full write access to the target folder or choosing a different, less restricted export destination typically resolves this issue.
Export Error Codes
If you encounter an error during export, please contact our support team at support@evoto.ai. To help us resolve the issue faster, kindly include a screenshot of the error code in your Export List.


