The Masking feature allows for nondestructive, precision editing by isolating specific areas of an image, such as people, pets, backgrounds, or custom regions, for targeted color adjustments. Whether you’re fine-tuning skin tones, enhancing a sky, adjusting pet fur colors, or selectively applying HSL or color grading, masking gives you full control over localized edits.
Accessing the Masking Feature
To begin using masks:
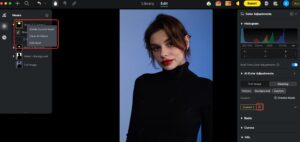
- Go to the Color Adjustments feature group.
- In the Option Control Panel, select the Masking tool.
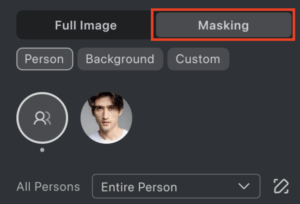
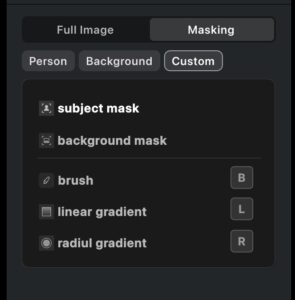
Under Masking, you can select from:
- Person Mask: Apply adjustments to an individual person or specific facial or body areas.
- Pet Mask: Apply adjustments specifically to pets detected in your image.
- Background Mask: Apply changes only to the background.
- Custom Mask: Define your own mask using manual tools.
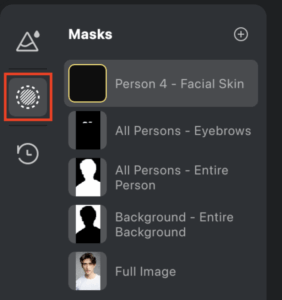
Once created, the mask will appear in the Quick Access panel in the top left corner.
Person Mask Options
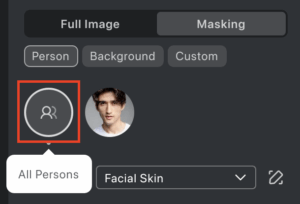
Evoto enables detailed control of individual people in an image. For each identified person, you can make targeted edits to an array of areas. Supports selecting different body parts and combining them into a single mask group.

Additionally, you can edit all persons simultaneously using the All Persons option. This includes sub-masks and supports effect syncing across the project.
Ears
A new Ears mask is available under Person Masks for targeted ear adjustments.
Apparel
A new Apparel mask category has been added under Person Masks, including the following sub-masks:
- Clothing: Tops, Inner Layer, Dress, Bottom, Shoes
- Accessories: Headwear, Gloves, Bag, Jewelry
Pet Mask Options
![]()
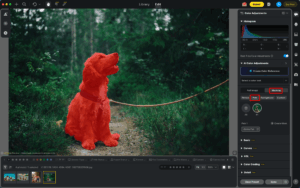
Evoto introduces dedicated Pet Masking, allowing you to apply local color adjustments specifically to pets in your photos.
When a pet is detected in your image, select the Pet mask to see the overlay highlighting the pet area. Available pet mask regions include:
- Entire Pet: Select the whole pet for overall adjustments.
Pet Masking enables you to create professional pet portraits by adjusting the pet’s colors independently from the person and background, giving you complete creative control over every element in your photo.
You can apply the same color adjustment tools to pet masks:
- Basic – Adjust exposure, contrast, highlights, shadows, and more
- Curves – Fine-tune tonal adjustments
- HSL – Modify hue, saturation, and luminance for specific colors
- Color Grading – Apply color toning to highlights, midtones, and shadows
- Detail – Adjust sharpen
Background Mask Options
Evoto enables detailed control of the background in an image. Supports selecting different types of backgrounds and combining them into a single mask group.

Reef
A new Reef mask is available under Background Masks.
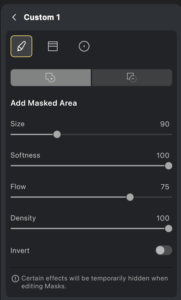
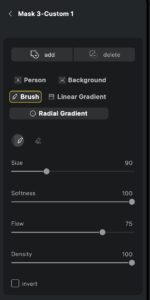
Custom Mask Types
Create personalized masking areas with three flexible tools and two combined masks options (subject/background).
Brush Tool
Use the brush to manually add or remove mask areas.
Adjustable parameters include Size, Softness, Flow, and Density.
You can also use Invert to reverse the selected mask area.
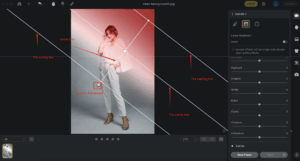
Linear Gradient
Ideal for skies, horizons, or architectural elements.
Customize the gradient by adjusting its direction and area using three horizontal lines and one vertical center line. Drag the center extension to rotate the mask.
You can create multiple linear masks and reposition them if needed.
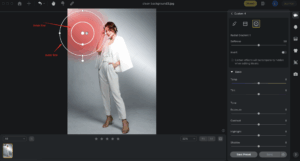
Radial Gradient
Use this for circular or elliptical masking, perfect for isolating faces or sun flares.
Two ellipses represent the soft start and end of the gradient.
Drag from the center or outer line to resize, reposition, or rotate the mask.
Luminance Range

A new Luminance Range has been added to the Local Color Adjustment masks, allowing users to create selections based on image brightness for more precise adjustments of highlights, shadows, or midtones.
How to Access
- Select Luminance Range under Custom.
- Add from the + menu in the mask list.
- Use Shift + Q in the Local Color Adjustment panel to quickly activate the Luminance Range.
Mask Selection Methods
- Slider Control: Inner sliders set the lower and upper limits of the brightness. Outer sliders control the edge transition for smooth blending. Inner and outer sliders can overlap or be adjusted independently.
- Click on Image: Click directly on the image to automatically generate a mask and match the corresponding brightness range.
Supporting Features
- Show Luminance Map: Display the image in black and white to help visualize brightness levels.
Notes: Supports inverted mask regions. Luminance masks can be synchronized and saved in presets.
Smart Selection

The Smart Selection feature uses AI technology to allow users to quickly select specific areas in photos through clicks, frame selection, or brush strokes, significantly reducing the complexity of mask operations.
Three Smart Selection Tools
- Segment (Semantic Selection): AI pre-segments all objects in the photo, displaying selectable areas in real-time as the mouse moves. Supports point and box selection.
- Interactive (Interactive Segmentation): Intelligently segments in real-time as the mouse moves, dynamically displaying the split area. Supports point and frame selection.
- Quick (Fast Selection): Create and adjust selections quickly with brush strokes. Adjustable brush size (1-300px) with intelligent edge recognition.
Operation Modes
- Brush Mode: Click or drag to increase selection range; multiple selections auto-merge.
- Eraser Mode: Click or drag to reduce selection area.
- Invert: One-click invert selection and non-selection areas.
Edge Refinement Tools
- Smooth: Smoother selection edges (1-500 pixels).
- Expand: Proportionally enlarge selection edges (1-500 pixels).
- Contract: Proportionally shrink selection edges (1-500 pixels).
- Feather: Create gradient transparency transition at edges (0.1-1000.9 pixels).
Note: All three selection tools can be combined and layered. Switch between tools within the same selection for fine-tuning.
Editing and Managing Masks
Right-click any created mask in the Local Mask list to Edit or Delete it.
To reposition a mask, click and drag it in the preview area when the hand icon appears.
Use the Invert option to flip the masked and unmasked areas.
Mask Add/Subtract
When using the “Add Mask” function, all masking tools can be used to select an area, multiple tools can be applied to the same area.
In “Subtract Mask” mode, users can use all masking tools to remove areas from an existing mask. The removed areas will appear as sub-masks in the mask list.
Note: The shortcut X can be used to switch between Add and Subtract modes.
Usage Example:
After creating an overall mask that includes all parts of body, if certain parts of a subject’s face or clothing do not need adjustment, users can switch to “Subtract” mode and remove the corresponding area from the mask. The remaining mask area can then be adjusted independently.
Expanded Color Adjustment Support
Local masking supports more than basic color adjustments. You can also apply:
- Curves
- HSL
- Color Grading
This gives you expanded control over tones, color corrections, and stylized edits within masked areas.
Quick Access: Masking Visibility Control
The Eye Icon in the Quick Access panel controls mask visibility:
- Eye Open shows the active mask and its effects.
- Eye Closed hides the mask’s effects and excludes it from export.

Hovering over a mask icon highlights the masked area in the image preview.
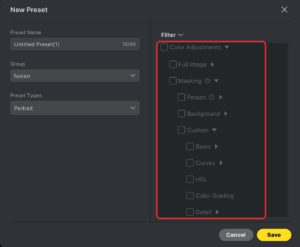
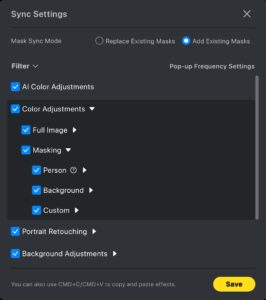
Presets and Syncing
You can save and sync adjustments for the following:
- Full Image
- Masking
- Person (applied globally, not per individual)
- Pet (New in 6.2)
- Background
- Custom
How to Synchronize Masks
-
Click Sync.
-
Navigate to Filter → Color Adjustments → Masking.
-
In the synchronization options, choose one of the following modes:
-
Replace Existing Masks: Replaces all existing masks in the target image.
-
Add to Existing Masks: Adds the current mask on top of the existing masks in the target image.
-
Masking gives you unmatched creative freedom and control. From subtle enhancements to dramatic transformations, localized edits empower you to fine-tune every part of your image with precision and intention.


