Evoto Video combines AI portrait retouching and color grading in a streamlined video-editing workspace. This guide walks you through the main areas of the interface and explains how a typical editing session works.
Project Panel
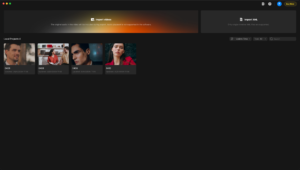
The Project Panel is the starting page of Evoto Video. It is where you import source footage, bring in supported XML files, and access key utility tools such as export records, feedback and account settings.
Local Project Management
Evoto Video stores your projects locally, so you can work on several projects and return to earlier work at any time. Importing a new video no longer overwrites your previous project.
- You can switch between multiple projects, but only one project can be open at a time.
- When you return to the project list, the current project is saved automatically.
Import Area
On the Project Panel, click Import Videos to select supported video files from your device. Evoto Video currently supports .mp4, .mov, and .m4v files.
Note: The original audio in the video will be included during export. However, audio playback is not supported inside the software during editing.
Importing Multiple Videos
A single project can now contain multiple videos, so you can import, edit, analyze, and export several clips together instead of processing them one by one.
- One project can include videos with different formats, resolutions, frame rates, and color spaces.
- The 18,000-frame length limit per project still applies.
XML Import Area
To the right of Import Videos, click Import XML to import an XML file instead of a video file. This option is designed for timeline-based workflows and currently supports single-timeline XML files only.
Export List
The Export List icon opens the export history panel, where you can review previous export tasks. This panel includes details such as file name, export type, quantity exported, export status, export time, and available operations.
Help
Provide Feedback
Use Provide Feedback to submit feedback or report issues to the Evoto team.
Proxy Settings
Proxy Settings let you route Evoto Video’s network traffic through a proxy, which can improve the stability of login, upload, analysis, and export in restricted or unstable network environments. You can find it under Help > Proxy Settings.
Note: Proxy settings are turned off by default. When disabled, Evoto Video connects directly to the service and does not use your computer’s system proxy. Most users do not need to configure a proxy—enable it only if you already have a working proxy or VPN, if your organization enforces network restrictions, or if you experience frequent connection errors.
Personal Center
The Personal Center icon opens your account panel. From here, you can check your remaining export vCredits, access basic product information, check for updates, and sign out of your account.
Buy Now
The Buy Now button provides a quick entry to purchase-related options for Evoto Video.
Editing Panel
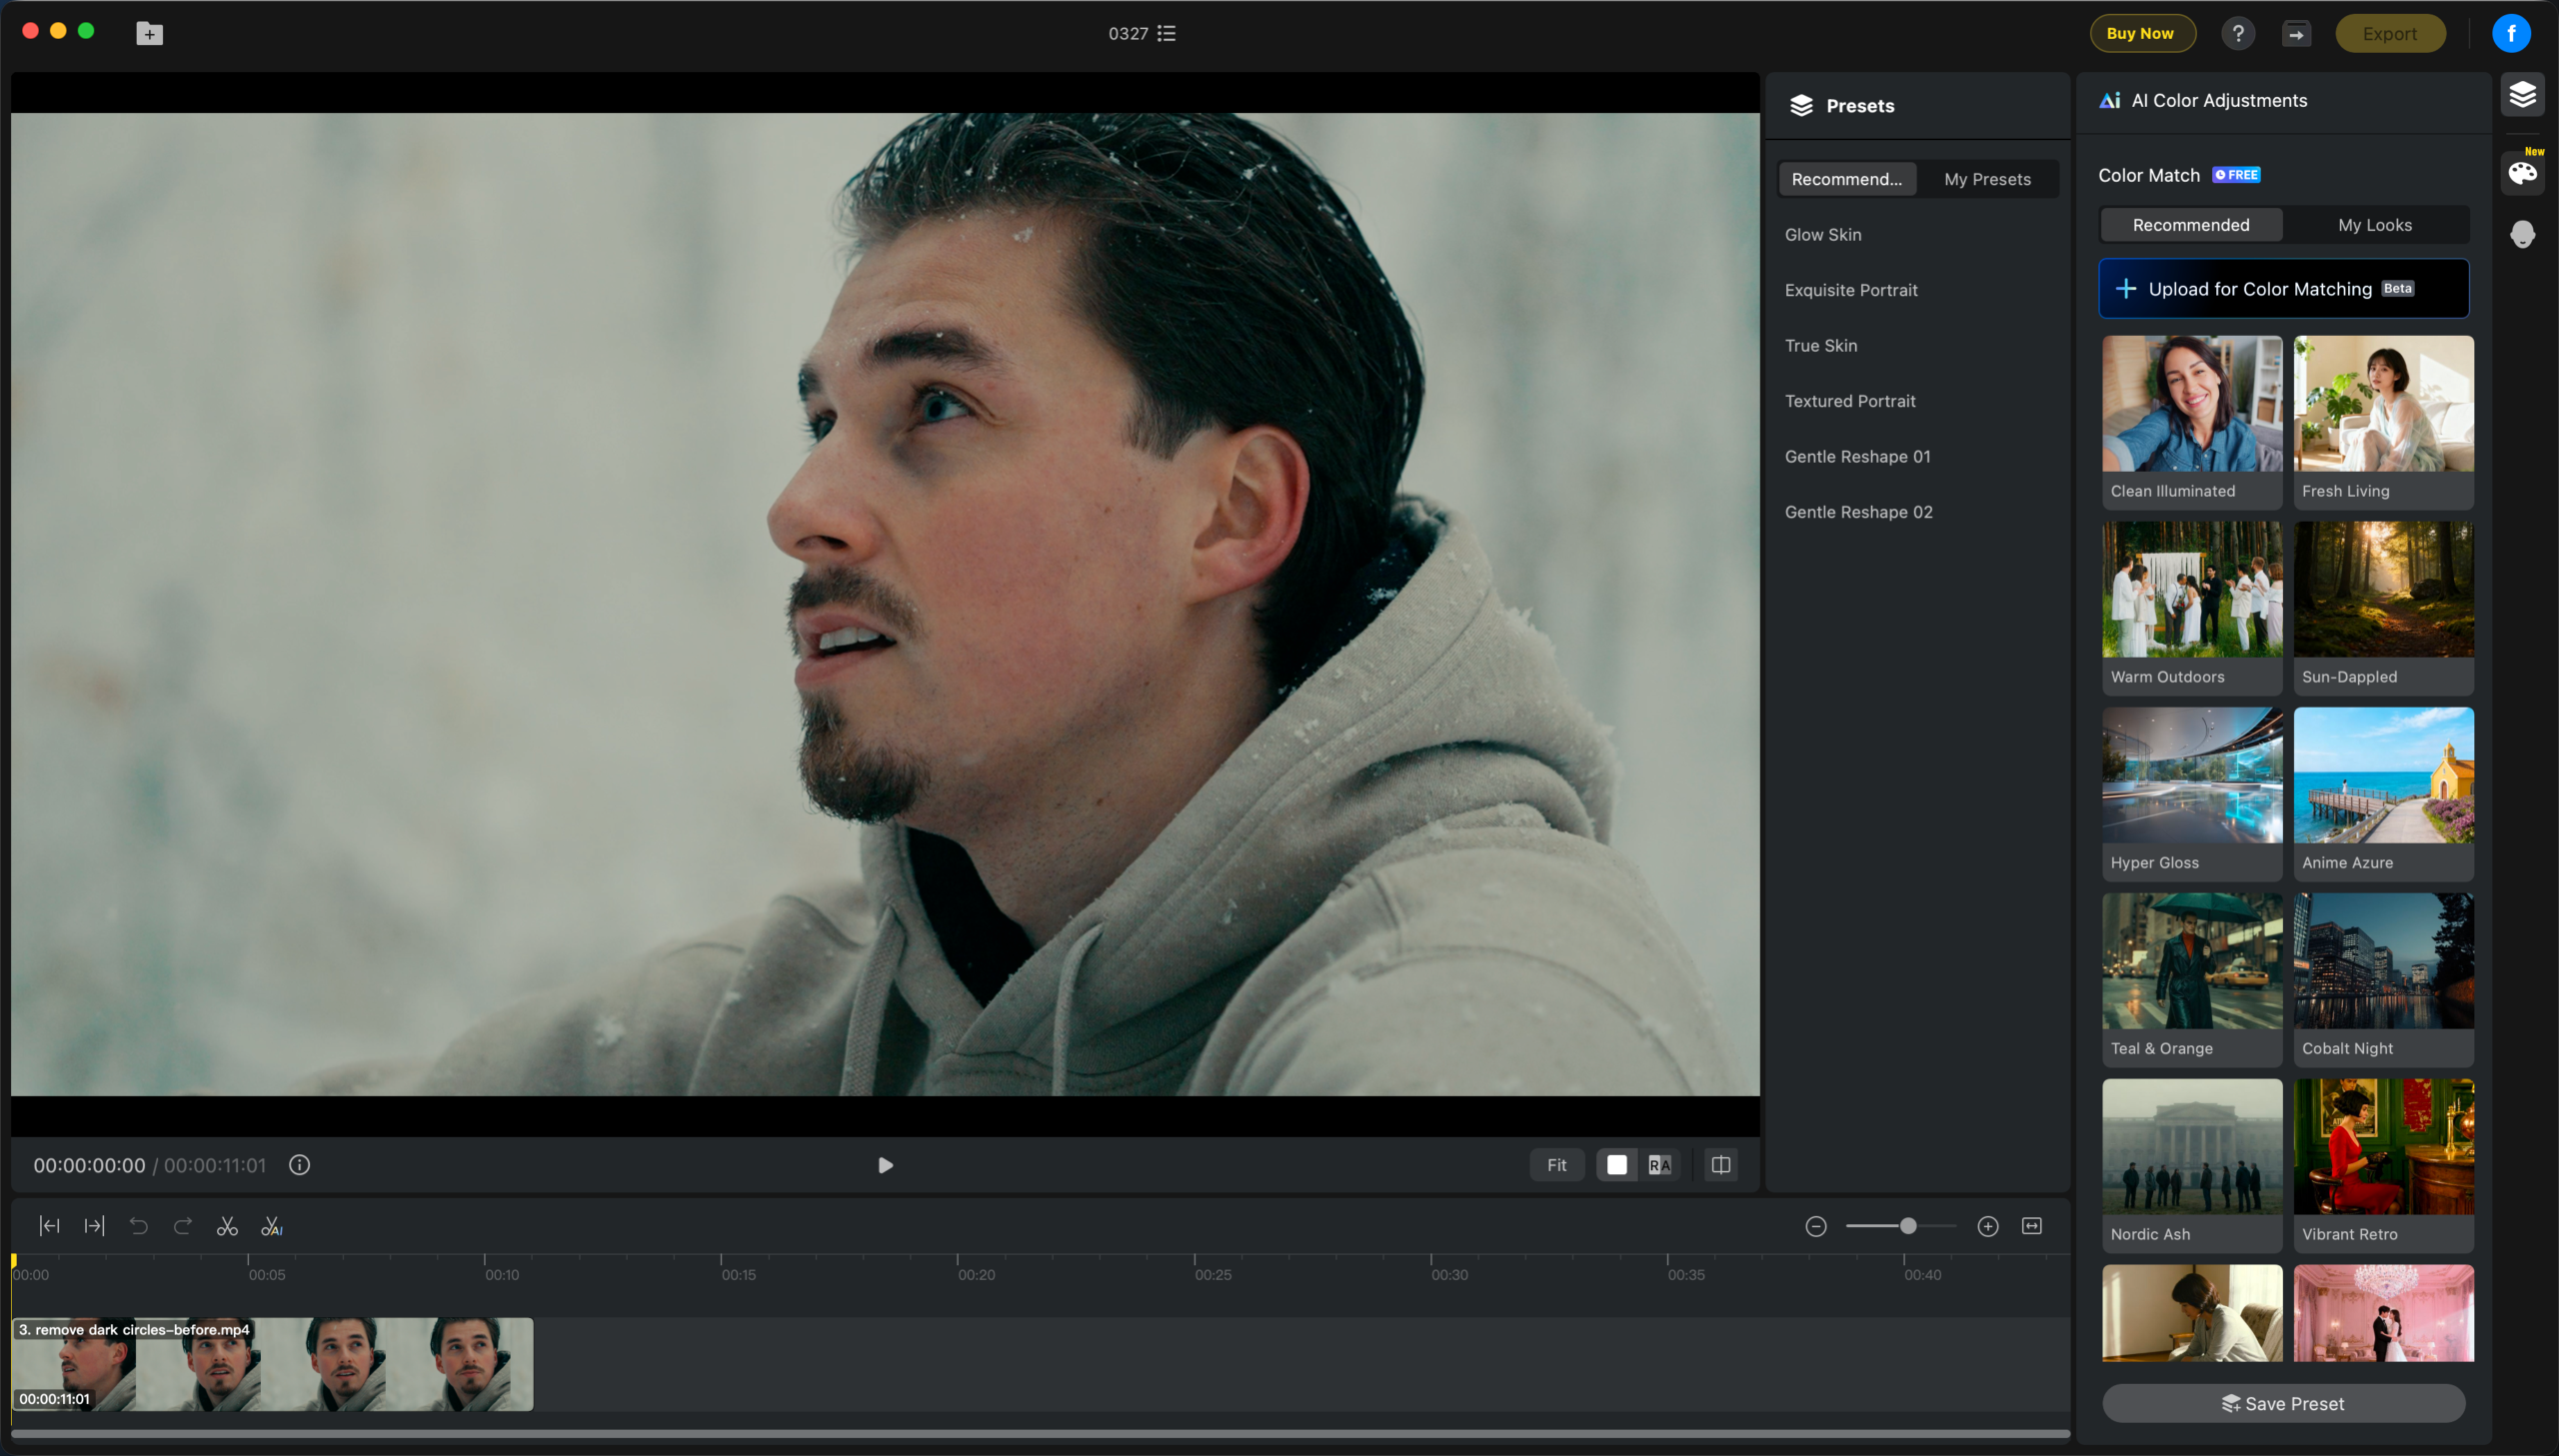
Preview Window
The preview window sits in the center of the interface and lets you inspect a single frame while adjusting retouching or color settings. For performance reasons, preview playback is capped at 1080p, but your final export keeps the original resolution and frame rate. Canvas interaction has also been improved: zooming now centers on your cursor position, and you can freely drag the canvas within the visible area to inspect details more precisely.
Timeline
The Timeline is the main workspace for reviewing clip length, moving through footage, splitting clips, and checking how edits are applied over time. It helps you control both playback and clip-level operations during editing.
Timecode Display
The timecode area shows your current playhead position and the total duration of the selected clip or timeline. This helps you track exactly where you are while reviewing or editing footage.
Playback Control
The “Play” button lets you preview the current clip from the playhead position. Use playback to review retouching or color adjustments after effects have been rendered.
Timeline Tool Bar
The toolbar above the clip track provides quick editing controls for navigation and clip operations. Common tools in this area include:
- Jump Back / Jump Forward: Move quickly between positions in the clip.
- Undo / Redo: Revert or restore recent timeline actions.
- Split Clip: Use the scissors tool to cut the clip at the current playhead position.
- AI Scene Split: Automatically detect and split footage into separate scenes for faster editing.
Clip Deletion
In the timeline, you can delete selected video clips to remove unusable shots, trim extra footage, or refine the structure after automatic scene splitting.
Copy, Paste, and Clear Effects
Batch effect operations help reduce repetitive editing when working with multi-clip videos. After fine-tuning one clip, you can copy its effects and apply them to other clips in the same project.
- Copy Effects: Right-click a timeline clip and select Copy Effects, or use Ctrl/Cmd + Shift + C.
- Paste Effects: Select one or more target clips and choose Paste Effects, or use Ctrl/Cmd + Shift + V.
- Clear Effects: Use Clear Effects to remove applied effects from selected clips and restore them to their original video state.
Note: Pasted effects overwrite the target clip’s existing effects instead of stacking on top of them. Copying and pasting effects between projects, or copying only selected effects, is not supported.
Aspect Ratio Adjustment
Aspect Ratio Adjustment lets you adapt the same video for different output formats without creating a separate project. Supported ratios include Original, 16:9, and 9:16. Changes are reflected immediately in the preview, and exported videos follow the preview canvas.
Current limits: Aspect ratio adjustment is not supported for XML projects and cannot be changed from the export page.
Time Ruler
The ruler displays time markers across the top of the timeline, making it easier to locate moments in the video and place edits more precisely.
Clip Track
The clip track shows your imported video as a thumbnail strip. This makes it easy to visually identify different parts of the footage and select the exact section you want to work on.
Playhead Position
The playhead marks the current frame location in the timeline. Move it to any point in the clip to preview that frame and apply adjustments at the desired moment.
View Controls
The controls on the upper-right side of the timeline help adjust how the timeline or preview is displayed. These controls may include:
- Fit: Adjusts the current view to fit the available panel space.
- Display Mode Buttons: Switch between different viewing or layout options for easier editing and review.
Zoom Controls
The zoom controls on the right side of the timeline let you zoom in or out for more detailed or broader timeline navigation.
- Zoom Out: View a longer portion of the clip at once.
- Zoom Slider: Adjust the visible timeline scale.
- Zoom In: See a more detailed section of the timeline for precise editing.
- Zoom to Fit Timeline: This function automatically resizes the timeline view to fit the full timeline within the current window for easier navigation and overview.
Horizontal Navigation
The scroll bar at the bottom of the timeline allows you to move across longer footage when the full clip is not visible in the current zoom level.
Right-Side Editing Panel
The right-side panel contains the main editing tools: AI Color Adjustments for reference-based color matching, Color Adjustments for scopes, manual color controls, color correction, and creative looks, and Portrait Retouching for portrait refinement. Switch between panels depending on the type of correction you want to apply.
AI Color Match
AI Color Match uses a reference image or a built-in look to match the color tone and visual mood of your footage. See the AI Color Adjustments article for details.
Color Adjustments
Color Adjustments includes video scopes, basic and advanced color controls, Color Correction, and Creative LUTs. See the Color Adjustments article for details.
Portrait Retouching
Portrait Retouching provides tools for refining facial features, skin, hair, makeup, teeth, eyes, and body shape. See the Portrait Retouching article for details.
Apply Effects
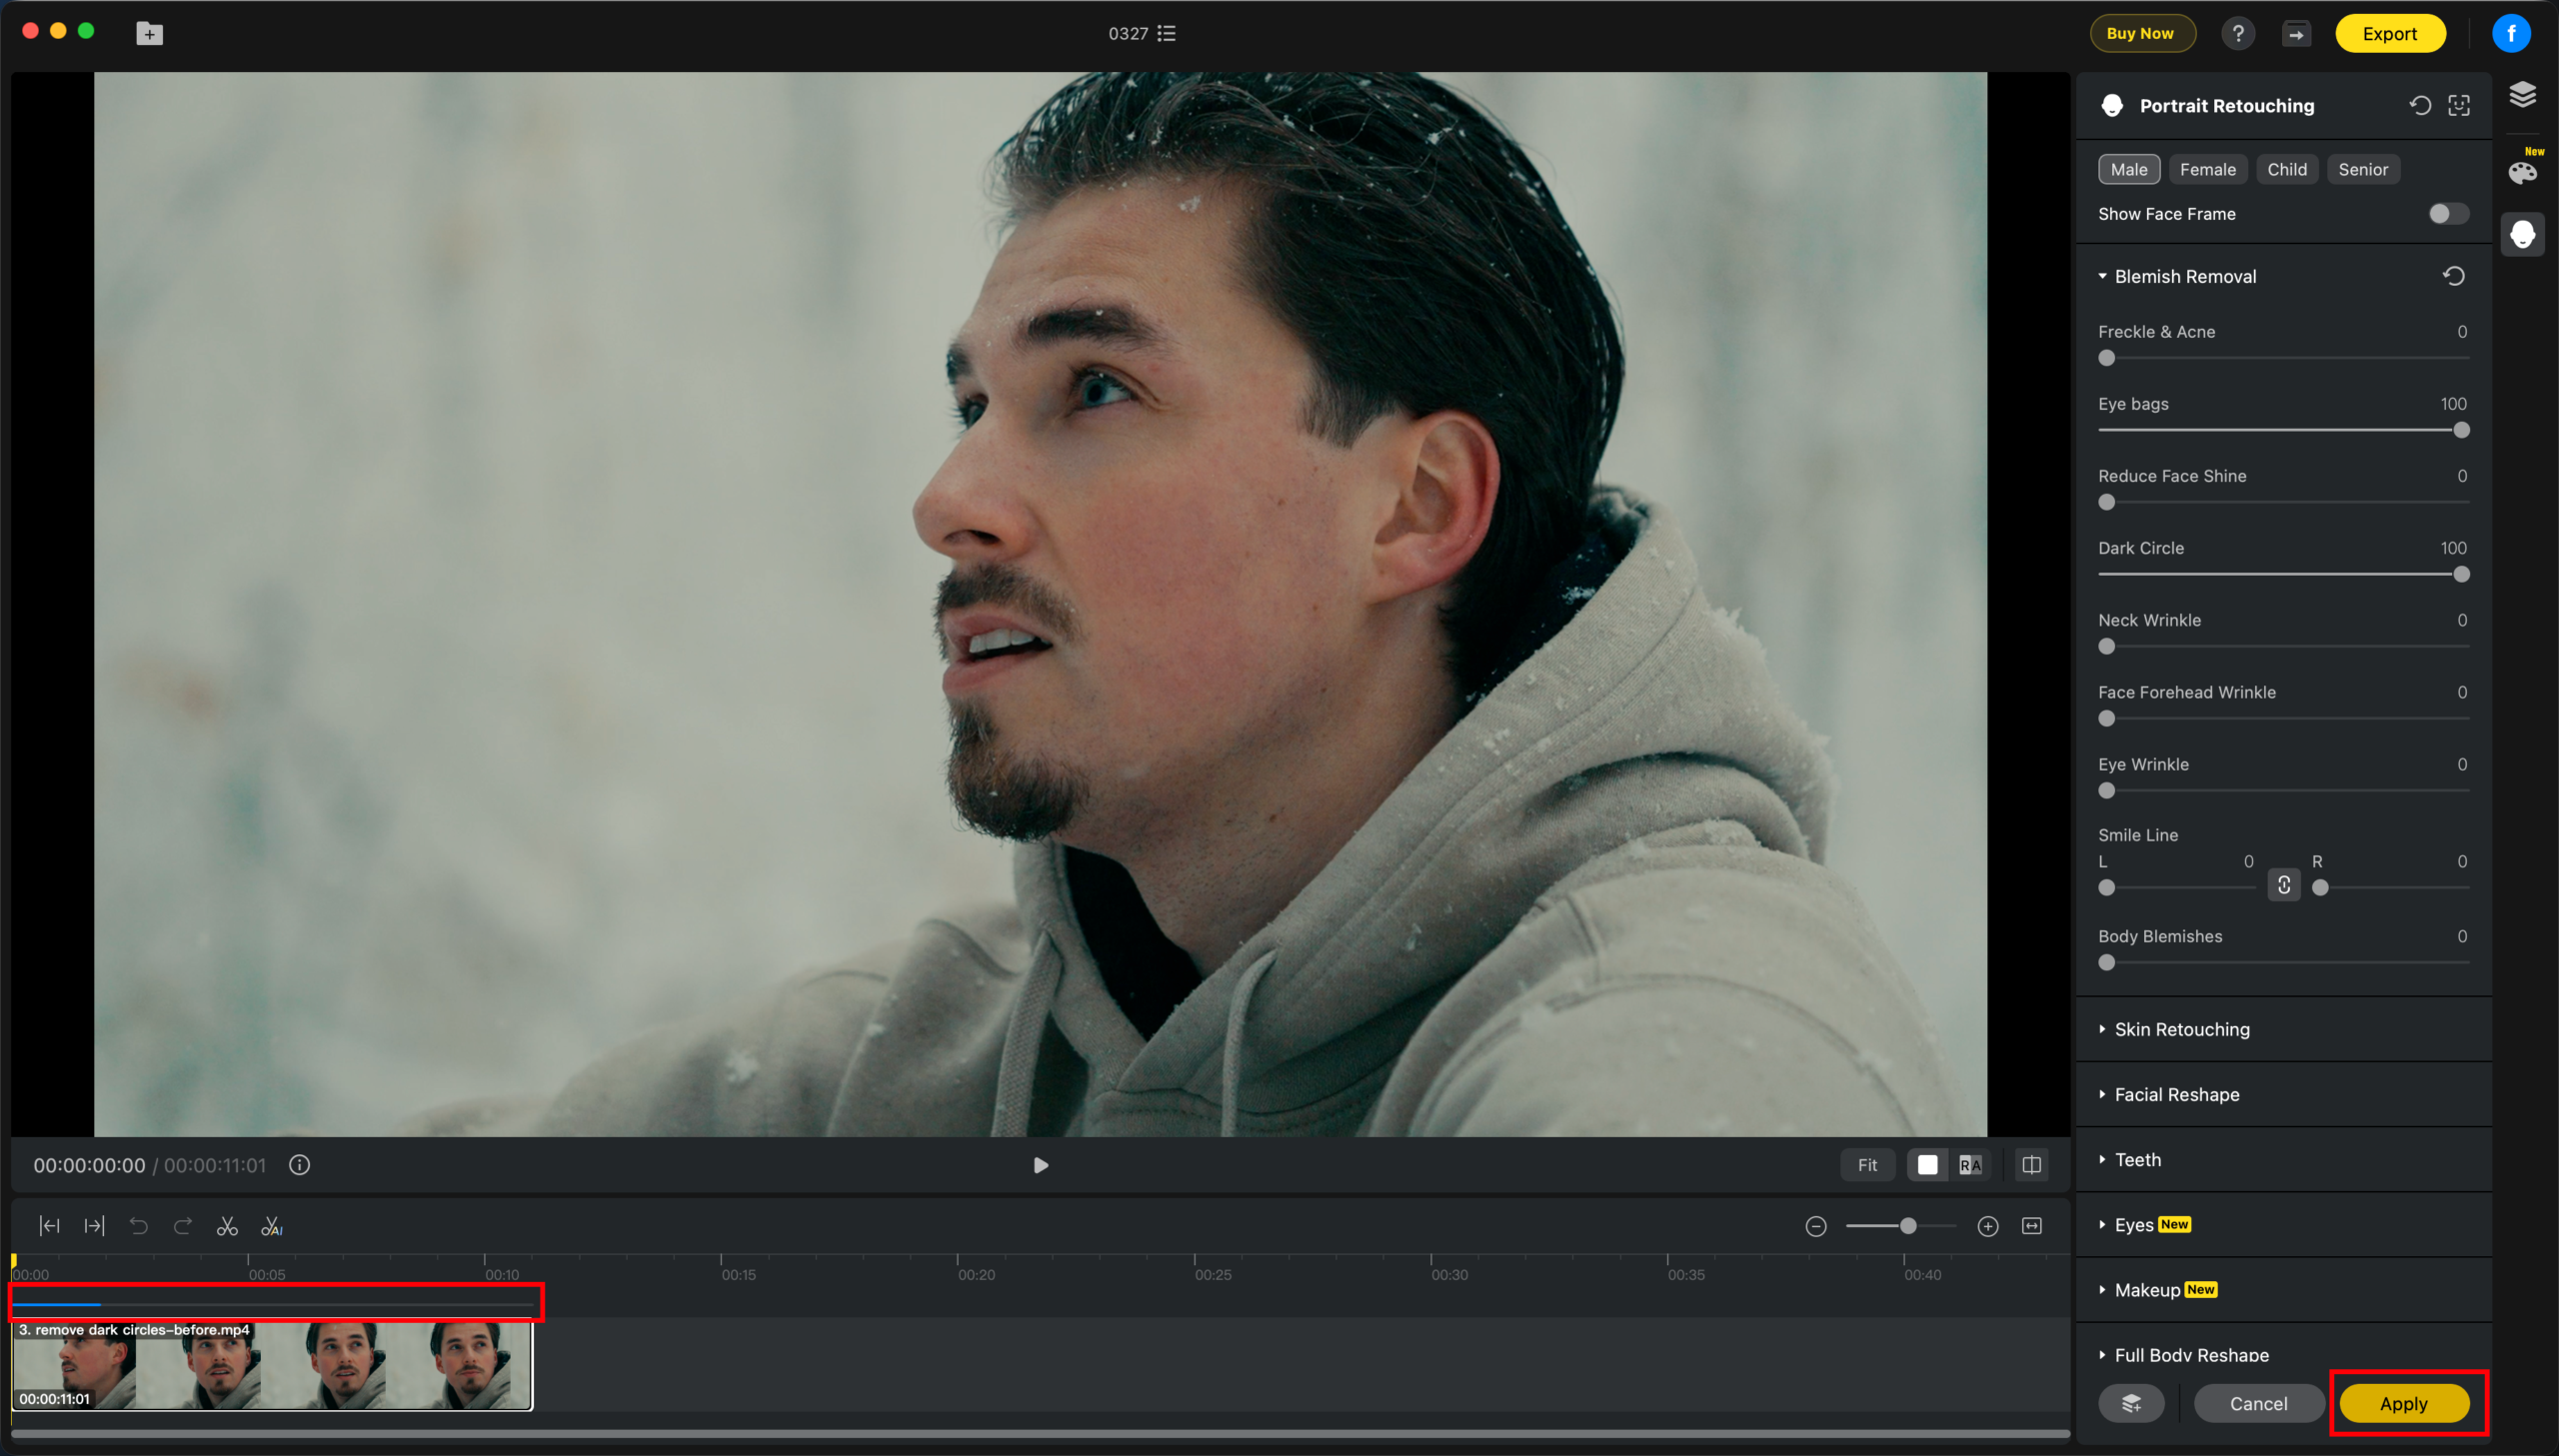
Unlike photo editing, video adjustments must be rendered across time. After making changes on a frame, click Apply Effects in the bottom-right corner to process the selected clip. A green progress bar indicates that rendering is complete and the clip is ready for smooth playback.
Save Preset
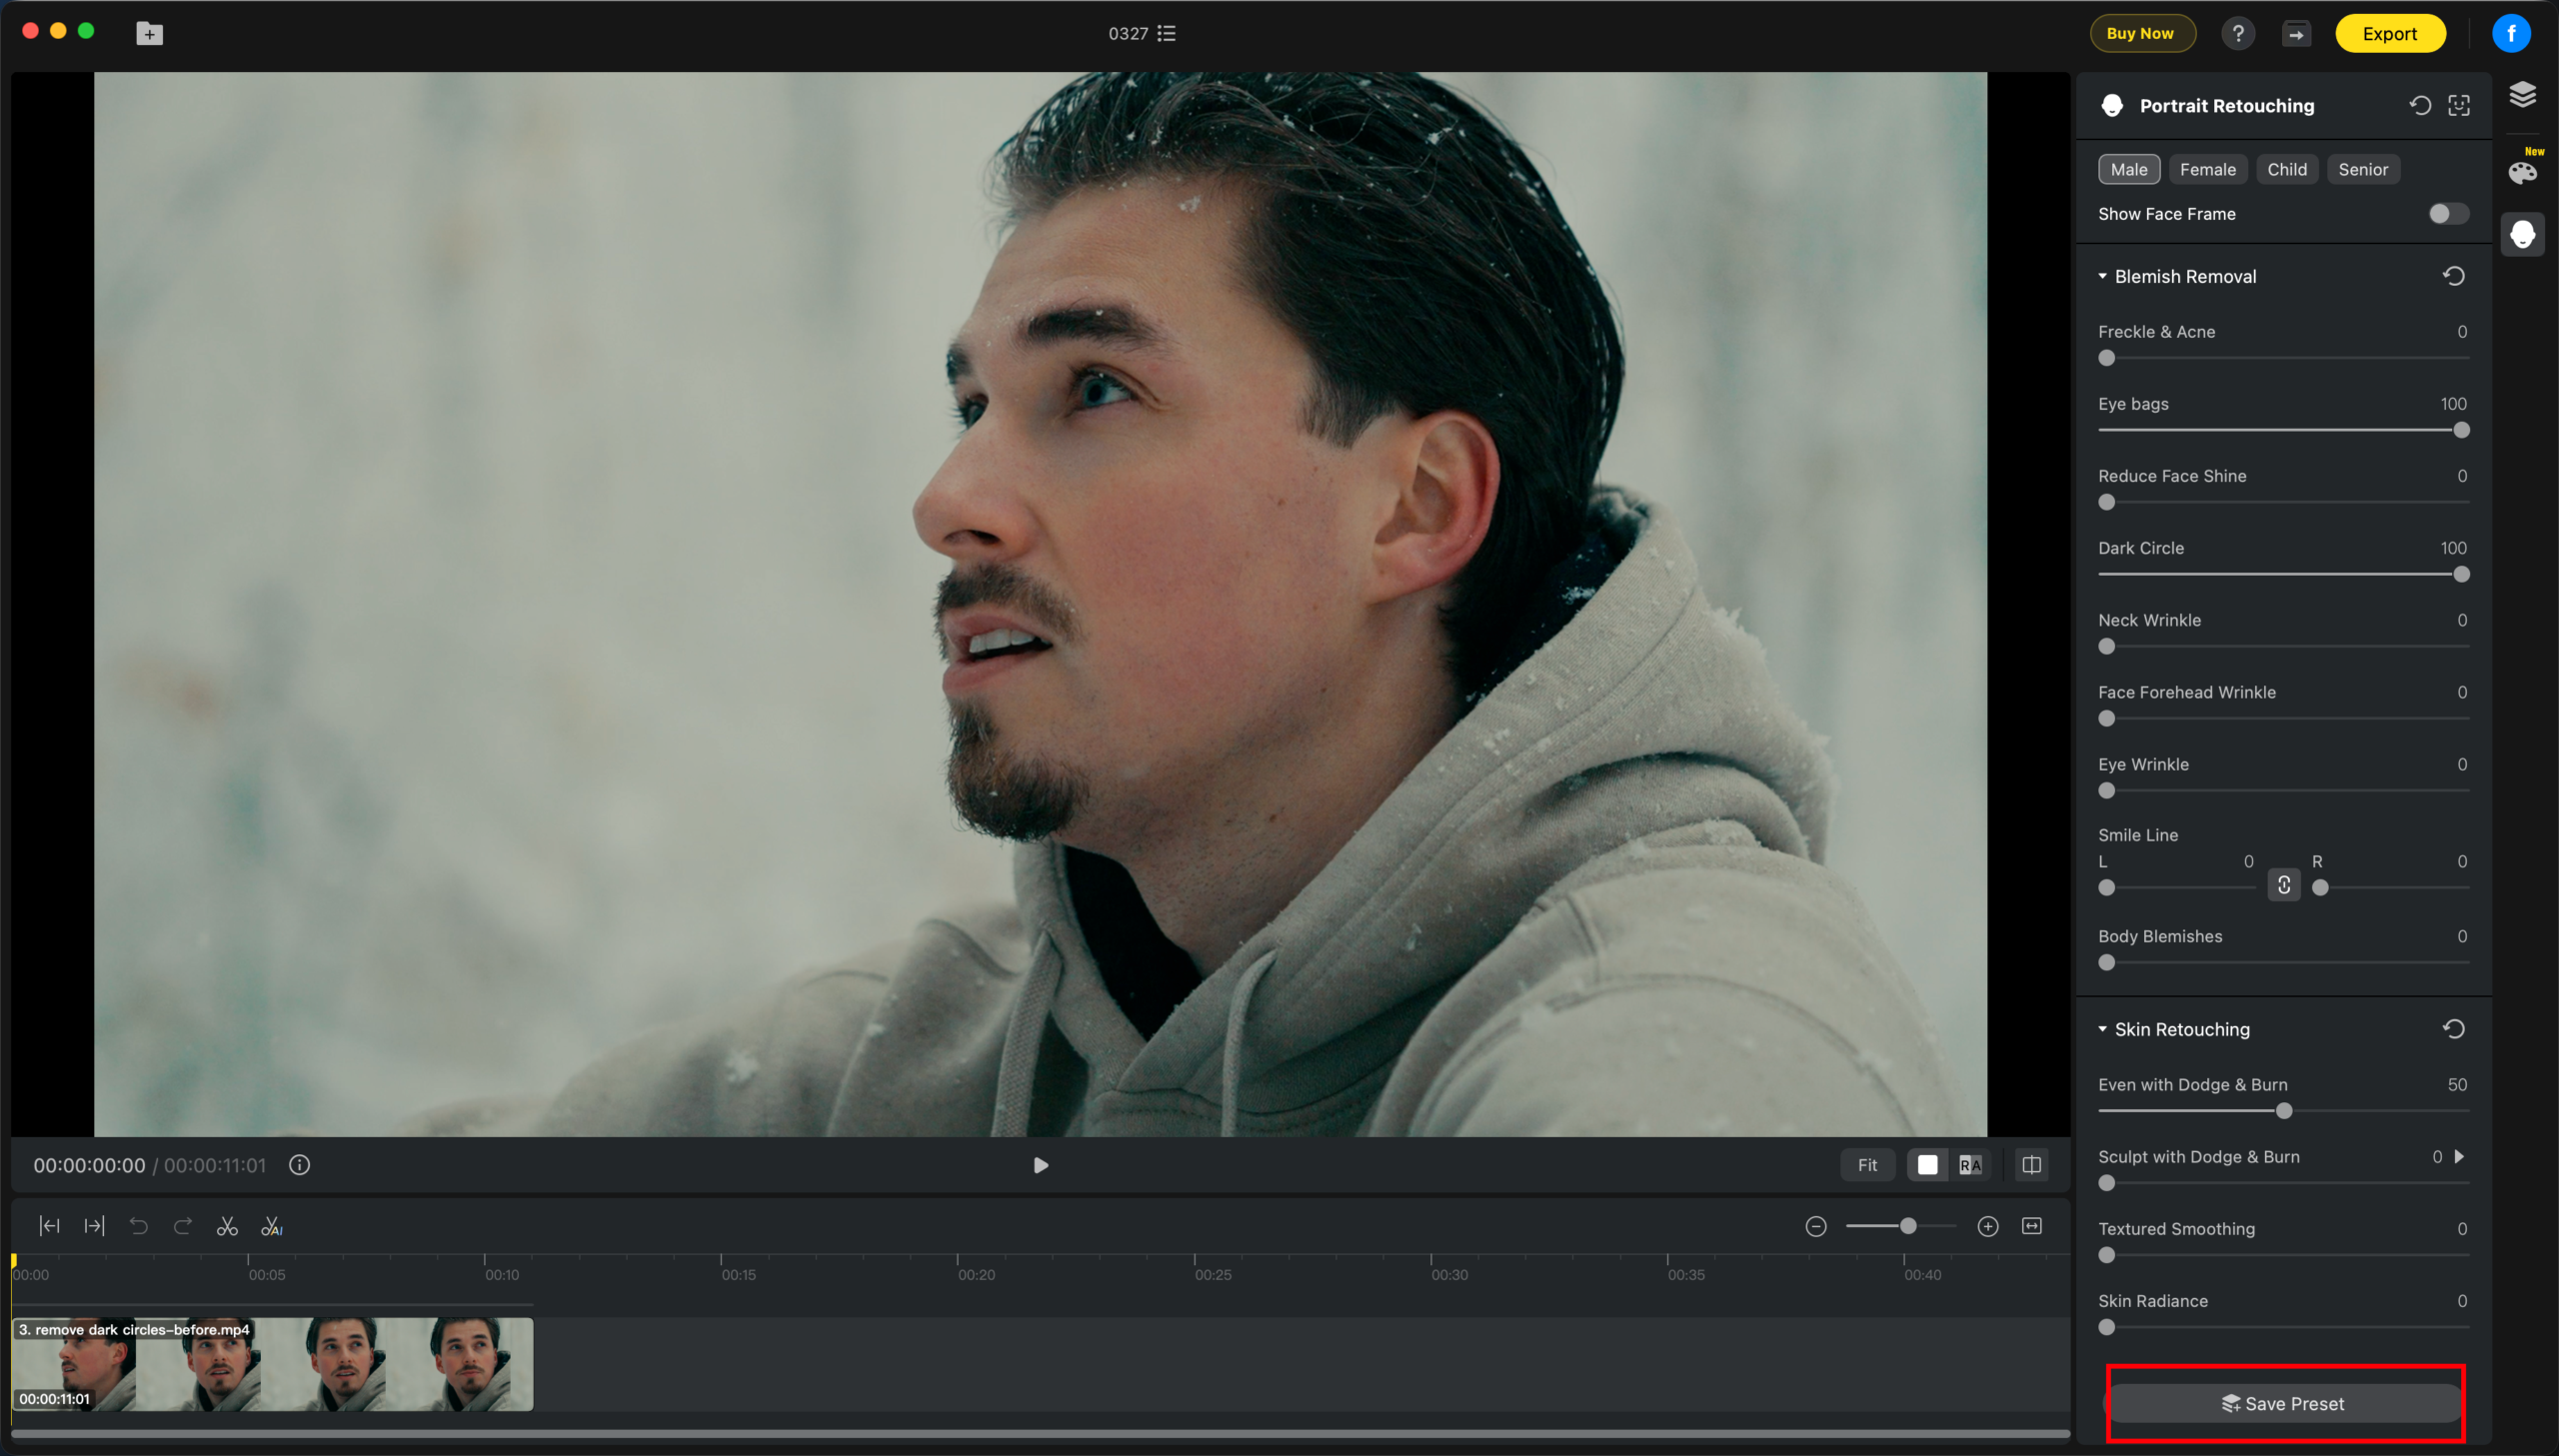
Save Preset allows you to save your current supported editing settings as a reusable preset for future clips or projects. This helps you apply a consistent look more quickly and improve efficiency when working on similar footage.