Smart Culling helps you quickly review and select the best photos from large projects, saving significant time and effort in one of the most repetitive stages of a photographer’s workflow. Whether you’re working with weddings, e-commerce, or any high-volume shoot, Smart Culling accelerates image selection while maintaining professional quality standards.
Want to see Smart Culling in action? Watch our step-by-step video tutorial below to learn how to maximize your efficiency and get the most out of this powerful feature.
Where to Find Culling
The Culling feature is available in the Library panel, under the Culling tab on the right-hand side of the window.The main subpanels within the Culling tab are organized as follows:
- Basic Info
- Filters
- Faces
- Photo Cluster
Note: Smart Culling works only at the project level. It cannot be run on individual folders or collections.
Subpanels Overview
Basic Info
Displays key metadata for the selected image, such as exposure value, ISO, aperture, shutter speed, focal length, and file format. This panel helps you quickly review the technical details of the current photo.
Filters
Use the Filters panel to narrow down photos from one place. It supports multiple filter conditions and helps you move through large projects more efficiently.
- Quality – Filter photos by AI quality results such as blur, exposure, and other technical screening criteria.
- Faces – Filter photos based on detected people and face-related screening results.
- Mark Sets – Filter by star ratings, color labels, flags, and other applied marks.
Faces
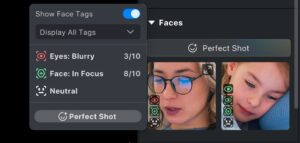
The Faces panel focuses on face-based review. In the current UI, this area brings together Perfect Shot, Face Tag, and Face Focus.
- Face Focus – A viewing mode that automatically centers and zooms on detected faces, making it easier to evaluate expressions and focus accuracy.

- Face Score Visualization – After Smart Culling completes, each detected face displays quality assessment labels with color-coded visual indicators. This feature helps you instantly understand how the AI evaluates each face across multiple dimensions:
- Eye Status: Open Eyes / Half-Open Eyes / Closed Eyes / Eyes Blurry
- Expression: Big Smile / Smile / Neutral
- Face Focus: In Focus / Soft Focus / Face Blurry
Hover over any label to see more details. In Face Focus fullscreen mode, hovering over a face displays all assessment labels for quick review.
 Perfect ShotWithin the Gallery interface, the Perfect Shot feature has been added under the Culling module. Users can select the best expression for each person from multiple photos of the same shoot, automatically generating a single ideal group shot.Fix Mode
- Auto Fix: The system automatically identifies and replaces faces with suboptimal expressions. Custom Fix can still be used after auto generation for manual selection.
- Custom Fix: Select individual faces to replace, preview available expressions, and manually choose replacements.
Apply ChangesClick Confirm to save the result. A new copy (tsq. format) is generated and saved in the same folder.Notes
- Matching Range: Automatically searches the 7 photos before and after the current photo (14 in total) for replaceable faces.
- Matching Target: Only matches faces of the same person.
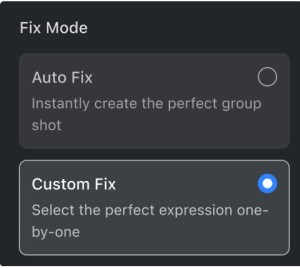
Photo Cluster
Intelligently group your photos to streamline the review and selection process.
- Time Interval: Photos are automatically grouped based on the capture time between shots. This helps you organize and review burst sequences or images from specific moments and sessions.
- Duplicates: Groups visually similar photos to help you manage near-duplicates. The AI uses quality scoring to identify the best photo in each similarity group, making it easier to filter out repetitive shots.
- Faces: Groups photos based on detected subjects. This allows you to review images by individual people to ensure you select the best expressions for each person.

Starting Smart Culling
To begin the Smart Culling process:
- Open a project in the Library.
- Navigate to the Culling tab on the right-hand side.
- Click Start Smart Culling. The process will run across all photos in the project (it does not work on individual folders or collections).
- When importing photos into a new project, you can enable Enable Smart Photo Analysis to analyze blur, closed eyes, exposure, face clusters, and other attributes in the background before or alongside culling.
- A global progress bar shows the analysis status while processing is running, and you can cancel the process while keeping completed tags.
- If Smart Photo Analysis was not enabled during project creation, it can be started later from the Culling sidebar.
- Once the process is complete, you can review the results in the subpanels.
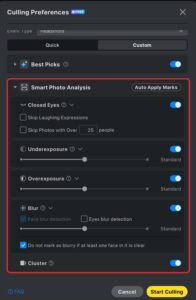
Smart Culling Preferences
Settings can be accessed when starting Culling or from the bottom of the right-hand panel.Start Mode: Use Quick for a faster default setup or Custom when you want to adjust the culling rules before processing starts.
Project-Level Settings
- Event Type: Select the shoot type (e.g., wedding, product) to help the AI provide more accurate results.
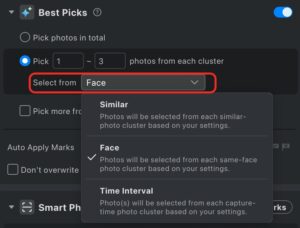
- Best Picks: Users can set the number of images AI automatically selects and define selection rules.
- Limit total AI Selection photos: Enter a specific number, and the AI will choose the best photos from all images based on scoring and algorithm, up to the specified total.
- Limit AI Selection photos per cluster: Enter a maximum and minimum value for each group. The AI will select photos within each group according to these settings. Users can choose to select photos based on three dimensions.
-
Duplicates: Displays the similarity cluster of the photo
-
Face: Displays the face cluster of the photo
- Time Interval: Sets the time threshold for grouping images. Photos taken closely together within this duration are grouped into one cluster for AI selection.
-
Note: If you set both a total number of photos to be selected and a minimum number of photos per group, Smart Culling will prioritize the total number. As a result, the final selection may not strictly match the per-group minimum you specified.
- Auto Apply Marks – Automatically adds different types of tags to photos based on AI judgment and user settings for more flexible photo status marking.
-
Candidates: Photos AI considers acceptable quality but not meeting best standards
-
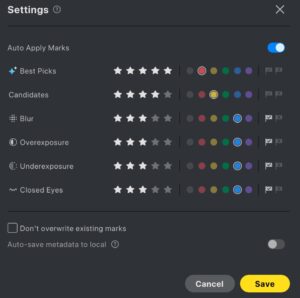
- Auto Save Tags to Local – After Smart Culling completes, automatically save tag results (stars, flags, color labels) to photo metadata as XMP sidecar files, compatible with Lightroom and other software.
Smart Photo Analysis
- Closed Eyes, Blur, Exposure Detection: Adjust the sensitivity levels for these features.
- Cluster Detection:
- Adjust the grouping sensitivity.
- Automatically organizes your photos into groups (clusters) so it can pick the best shots from each scene.
After Culling
- Once the culling process is complete, photos are displayed with the AI-applied tags.
- Use the Filter module to review results by Quality, Mark Sets, and Faces from a single floating panel. Multiple conditions can be combined and switched between AND and OR logic.
- Projects with duplicate detection enabled will automatically switch to Group Sorting.

- You can manually switch sorting modes in the bottom-left panel.
Limitations During Culling
While Smart Culling is running, the following actions are temporarily unavailable:
- Deleting projects or photos.
- Applying manual ratings (stars, flags, colors).
- Adding photos to the project.
- Using tethered capture.