Follow the steps below to configure your Canon camera and computer for wired tethered shooting with Evoto on desktop. This ensures a stable connection and optimal image transfer during your session.
Computer Settings
To ensure seamless tethered shooting, certain permissions and hardware considerations are important for your computer:
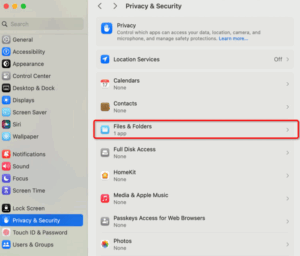
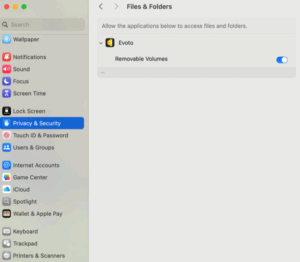
- macOS (15.0 and above): For macOS versions 15.0 and newer, you must enable File and Folder Permissions within your Privacy settings. Navigate to Privacy & Security > Files and Folders (or similar, depending on macOS version) and grant Evoto access to “Removable Volumes” or relevant folders where you intend to save photos.


Check Computer Connection (Initial Check)
Before starting, confirm your computer recognizes the Nikon camera when connected via USB.
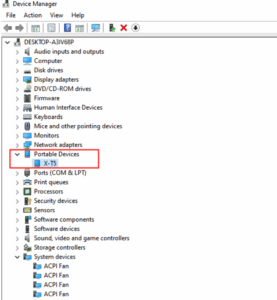
- Windows: Go to Device Manager, navigate to Portable Devices, and verify that your Fujifilm camera appears as a connected device.

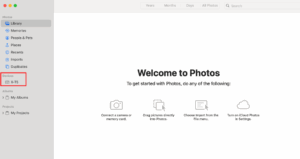
- macOS: Open the Photos application (or Image Capture) and check under Devices to confirm your Fujifilm camera is detected.

Canon Camera Settings
Adjust these settings on your Canon camera to prepare it for wired tethered shooting:
Power Saving Mode
It is crucial to turn off your camera’s Power Saving mode. When this mode is active, the camera may enter sleep mode and disconnect from Evoto if not operated for a period, interrupting your session.
-
Example (Canon EOS R6):
-
- Navigate to your camera’s Power saving settings.
- Set Display Off time to the maximum duration.
- Select Disable for Auto Power Off.

- Eco mode: Ensure Eco mode is set to Off (if available on your model).

USB Connection Application
Some newer Canon cameras require specific USB connection settings to enable tethering software.
- Example (R6 Mark II, R8, R5 Mark II):
- Access your camera’s menu.
- Look for an option like USB connection app or USB Functions.
- Set this to Photo Import/Remote Control or PC Remote.

Check Computer Connection (Initial Check)
Before starting, confirm your computer recognizes the Canon camera when connected via USB.
-
Windows: Go to Device Manager, navigate to Portable Devices, and verify that your Canon camera is listed and connected.
-
macOS: Open the Photos application (or Image Capture) and confirm that your Canon camera appears under Devices.
Image Save Location (In-Camera)
Determine where images will be saved after capture during your tethered session. This setting primarily dictates if a copy is saved to the camera’s card.
-
Within your Canon camera’s menu, look for settings related to Image Save Destination or PC Remote Save.
-
Still Img. Save Dest.: Computer Only (Recommended for direct transfer to computer, no copy on card).
-
Still Img. Save Dest.: Camera + Computer (Saves a copy to both the camera’s memory card and the computer).
-
Save Image Size: Set this to Original or Large (Required for optimal quality and full file transfer).
-
RAW+J Save Image: Set to RAW & JPEG (Recommended to capture both formats for flexibility).
-
Camera Firmware Version
For optimal performance and compatibility, ensure your Canon camera is running the latest firmware version. Firmware updates often include bug fixes, performance improvements, and enhanced tethering stability.
-
To check your firmware version: Navigate through your camera’s menu, typically under a Setup or Firmware section.
-
To update firmware: Visit Canon’s official support website, locate your specific camera model, and follow their instructions for downloading and installing the latest firmware.
-
Example: For Canon EOS R5, check for firmware updates via Canon’s official support site.
-


